Tuesday, September 15, 2009

Apple Macintosh Open Transport,TCP/IP Configuration Guide

A few caveats:

Do not attempt to configure any version of Open Transport prior to 1.1. Use MacTCP.

If this is a non-PCI version of the Mac Hardware, and Open Transport is installed, there will be an icon in the Apple Extras folder called the Network Software Selector.

1.gif

This will bring up the Network Software Selector. This is used to select between Classic networking (MacTCP) and Open Transport Networking. If the mode is changed via this selector box, the Mac must be restarted for the new mode to take effect.

2.gif

Go to the Control Panels and open the TCP/IP Control Panel.

3.gif

Connect via:
Ethernet

Configure:
Manually

IP Address:
a.b.c.d (where this is a valid unique host on the routed network)

Subnet mask:
255.255.255.0 (for an unsubnetted class C network)

Router Address:
a.b.c.1 (where a.b.c.1 is the IP address of the router)

Name server address:
Choose the physically closest machine from the list of Name Resolvers.

The domain name information can be left blank.

In the Additional Search domains box enter the domain name to speed up internal name resolution.

Close the box to accept the new information (use the upper left close box). 3

Specify that the current configuration should be saved.

Note: There should be no need to restart the Mac for IP changes to take effect.

The TCP/IP Options window displays.

4.gif

To use TCP/IP Apps make sure TCP/IP is Active. (Load only when needed can be checked.)

Click OK to accept these parameters.

The Info Button will bring up information about the TCP/IP Stack (IP address, MAC address, Router address, Version of Open transport and version of TCP/IP).

5.gif

Press OK to exit the Info window.

Microsoft Windows 95, TCP/IP Configuration Guide

In order to configure the TCP/IP Stack for Windows95 you need:

Double click on the My Computer icon on your desktop to open the My Computer window.
1.gif

From the My Computer window double click on the Control Panel icon.
2.gif

This opens the Control Panel window. Double click on the Network icon.

3.gif

This opens the Network window.

4.gif

Note: The Dial-Up Adapter may cause problems with the Ethernet TCP/IP adapter. If the Dial-Up Adapter component is installed in the Network Control Panel, highlight the Dial-Up Adapter entry and click on the Remove button. This will remove the Dial-Up Adapter from the system.

If TCP/IP for your Ethernet card is not installed, you may have to add it. (We are assuming that the driver for your Ethernet card is already installed.)

Click on the Add button in the Network window. This will bring up the Select Network Component Type window.

5.gif

Select Protocol and click on the Add button. This will bring up the Select Network Protocol window.

6.gif

Select Protocol and click on the Add button.

7.gif

Select Protocol and click on the Add button.

Once the proper Ethernet adapter and the TCP/IP protocol are installed, you must configure the TCP/IP information.

Make sure that the Primary Network Logon is the Windows Logon.

Select the TCP/IP protocol in The following network components are installed box.

8.gif

Click on the Properties button.

In the TCP/IP Properties window select the IP Address tab.

9.gif

Choose Specify an IP address.

In the IP Address box enter your assigned CIDR network number (a.b.c.x) where x is an UNUSED host IP address. (Keep in mind that the router has already been assigned the .1 host IP address.)

For example: 38.254.100.2

Enter 255.255.255.0 in the Subnet Mask box for an unsubnetted Class C network.

Select the Gateway tab.

10.gif


Enter the IP address of your router in the New gateway box. (a.b.c.1). Then click on the Add button.

For example: 38.254.100.1

After you add the new gateway, it should appear in the Installed gateways box.
11.gif

Select the DNS Configuration tab.


Choose Enable DNS.
Enter the host name of the machine in the Host box. (This should be a unique name chosen by you to refer to this machine.)
Enter your InterNIC registered domain name in the Domain box.
Add the IP addresses of the DNS Name Resolvers.

Enter the first resolver IP address in the top DNS Server Search Order box (see below) and click on the Add button.

This will add the IP address of the resolver in the lower DNS Server Search Order box (see below). Add the second resolver IP address in the same manner as the first. Leave the domain suffix search order blank.
13.gif

Click on the WINS Configuration tab.
Make sure that the Disable WINS Resolution is chosen.

14.gif

The defaults in the advanced settings will suffice.
15.gif

Select the Bindings tab.

If TCP/IP is the only protocol, then this box should be empty.
16.gif

Make sure that you select OK. This will return you to the Network window.
17.gif

Select OK again. You will be prompted to restart now. Answer Yes.

The TCP/IP stack should be available after the reboot.

Sunday, September 13, 2009

Microsoft Windows 98 TCP/IP Configuration Guide

Setting or Changing Your IP Address: Windows 95 or Windows 98

1.WIf your current Windows version did not come pre-installed on your computer, locate your windows installation CD. You may be asked to insert it at the end of the update process.
2.From your desktop, click with the right mouse button on Network Neighborhood and select the Properties menu item.
Network Neighborhood Icon
If you cannot find Network Neighborhood, you can go to the Start Menu, then look under Settings for the Control Panel. Find the Network icon in the Control Panel and open it.

Control Panel containing Network

3. You should see the Configuration page of the Network control panel. If you have a modem or more than one network card, there may be more items listed. Find the entry for TCP/IP associated with your network card, select it, and click on the Properties button.

Network Configuration Panel

4. You should see the Configuration page of the Network control panel. If you have a modem or more than one network card, there may be more items listed. Find the entry for TCP/IP associated with your network card, select it, and click on the Properties button.
Use the IP Address (or range) provided to you, not the one in this example!
TCP/IP Properties: IP Address Panel
5. Click on the Gateway tab. If there is anything in the list of Installed Gateways, select it, then click on Remove.
6. Now type in the IP address of your router in the New Gateway box and click on Add. (Home DSL users: use the Gateway IP address provided.)
Be sure to use the IP address of your router or gateway, not the one in this example!
7. You should now see your router's IP address (or your gateway) in the list of installed gateways.
8. Click on the DNS Configuration tab. Make sure DNS is enabled. Enter the name of your computer for Host. You can leave Domain blank, or you can enter your fully-qualified domain name (such as yourcompany.com or intranet.yourcompany.com). Enter 98.191.156.4 under DNS Server Search Order and click on Add.
9. Now enter 98.191.156.2 under DNS Server Search Order and click on Add. Click on OK to close the TCP/IP panel.
10. Click on OK again until you close the Network control panel.
If your current version of Windows did not come pre-installed on your system, you may be asked to insert your Windows installation CD. You may need to direct it to the drive letter of your CD drive. If it tells you that a file on your system is newer than the version on the CD, tell it to keep the version on your system.
11. You may need to restart your computer for the settings to take effect.

Do you want to restart your computer now?

Sunday, September 6, 2009

How do I Enable the Windows Vista Administrator Account?

In Windows Vista there is a difference between accounts with "computer administrator" privileges and the Administrator account. In the Administrator account the User Account Control is disabled. Also by default, the Administrator account is present, but hidden and disabled.

google_protectAndRun("render_ads.js::google_render_ad", google_handleError, google_render_ad);
Please be aware that Vista Beta 2 has a bug that may cause big problems, should you create a password for your Administrator account in Computer Management.

Enabling the Windows Vista Administrator Account.

Here are two methods that will teach you how to enable the Windows Vista Administrator Account.

Method 1
Start by booting your computer to Vista in your computer administrator account Next open administrative tools in the control panel.

Double click the computer management item, this will open it.

1. You then authorize user accounts control by clicking the continue button.
Double click on "local users and groups", this will open it.
Click the user's folder.
Select the administrator icon.
Right click it to open its content menu.
Choose properties.
Remove the check mark from the "account is disabled" box.
Click OK.
Restart your computer.

2. Once your computer has restarted, open the administrative tools control panel.
3. In the Users area, disable any other enabled accounts with computer administrator privileges.
Look for account icons that do not have the red disable mark.
Click to place a check mark on these account icons.
4. Next you open Properties.
Click to add a check mark in the box labeled "Account Is Disabled."
5. Check to see that your Administrator account is enabled.
6. You can now close Computer Management and restart Windows.
7. When vista reboots the administrator account will be loaded automatically.
Be advised that this method is for temporary use only, for security reasons. You should never leave your Administrator account enabled without a password.

Method 2
1. Turn on your computer.
As Windows is starting up, when you see the "Starting Windows" come on your screen, quickly press F8.
In a dual-boot environment, this can be done easily from the boot menu.
2. When the boot menu is showing:
Using the arrow or tab keys, you will select "Microsoft Windows" (this is the option that runs Windows Vista).
Do not press Enter, instead you press the F8 key, and you will progress to the Safe Mode boot screen.
At the Safe Mode boot screen, you will select the first option, "Safe Mode".
Press Enter.
It will take a few moments but Vista will present to you a login screen that has two options, Administrator and Other User.
3. Click on the Administrator icon.

Your Windows Vista Administrator account has now been enabled.

Wednesday, September 2, 2009

Link Multiple GMail Accounts In 4 Easy Steps

What is linking multiple email accounts?
You have multiple email accounts which you must be using for different purposes, but you don’t like opening the inbox for every account and check the emails. Wondering if there is any way to link multiple accounts and receive emails on a primary address?

How to link multiple Gmail accounts together?
Gmail is a free email service that offers a lot of functionality. for example , If you have more than one Gmail accounts you can easily link them together and send/receive emaisl from one master Gmail account and keep everything together without having to switch back and forth between accounts.

You can easily link multiple Gmail accounts in 4 steps:
Step 1: Add A Secondary Email Address
Step 2: Forward Incoming Mail
Step 3: Create a Label
Step 4: Create a Filter

Step 1: Add A Secondary Email Address:
In your Primary (the one you want to send and receive all of your mail from) Gmail account click Settings at the top right corner of your screen.
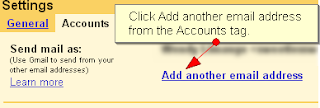
Click the Accounts tag.
Select Reply from the same address the message was sent to under When I receive a message sent to one of my addresses:
Click on Add another email address. A window will pop up.
Fill in the information for your secondary email account and click Next Step.
Click Send Verification. Close the pop-up window.
Login to your Secondary email account and click the verification link in the email sent from Gmail.

Step 2: Forward Incoming Mail

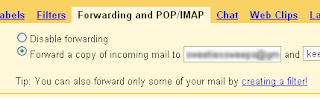
In your Secondary email account, click the Forwarding and POP/IMAP tab found under Settings at the top right corner of the screen.
Type your Primary email address in the Forward a copy of incoming mail to box.
Then pick an option from the drop-down list:
keep Gmail’s copy in the Inbox
archive Gmail’s copy
delete Gmail’s copy
Click Save Changes.

Step 3: Create a Label

Switch to your Primary email account, scroll to the bottom of the page and look for the Labels box on the left-hand side of the window.
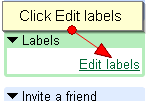
Click Edit labels at the bottom of the Labels box.
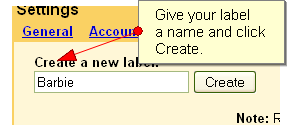
Click in the box under Create a new label: and type a name for your label. You could use the actual email address if you want.
Click Create.
Step 4: Create a Filter:

Still in the Primary email account, click the Filters tab, which is next to the Labels tab, and then click Create a new filter.
Type your secondary email address in the To: box.
Click Next Step.
Click in the box next to Skip Inbox to select it.
Click in the box next to Apply the label: to select it and pick the label you created from the drop-down list.
Click Create Filter.
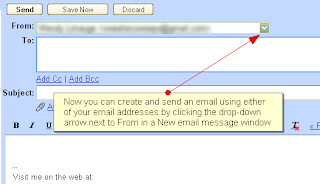
You are done now! emails from your Secondary email accounts will be forwarded to your Primary email account and automatically go into the Label (folder) which you have specified. Using Filters helps to keep your email separate and organized so you don’t have all of the emails from multiple email accounts going into the same Inbox.You can also send emails from both email accounts from the Primary email account without even switching to the Secondary email account.
How to Install IIS in Windows XP

Windows XP Professional edition has the built-in IIS. Internet information server is used to host the website on your own computer and these sites can be accesses from all over the world. IIS has great administrative features but it supports only 10 concurrent connections of the clients at a time.
1. Click start>settings>control panel>Add remove program2. Click Add remove windows components.3. Click on Internet information services > Details.4. In the IIS check the boxes SMTP and World Wide Web and you can also check FTP if you want to setup it.5. In Windows components selection, make sure that you have selected IIS and you may need to insert the CD of Windows XP Professional during the installation.

Tuesday, September 1, 2009

Install & use multiple Google Talk for gtalk chat

Be default we can only login into one Google talk account and chat with select group of people. Do you want to login into multiple Google Talk accounts and chat with different set of Google Talk buddies? If yes, login intocmultiple Gtalk simultaneously by following methods.
1. Quick manual method for multiple Gtalk
1. Click Start > Run and type C:\Program Files\Google\Google Talk Alternatively, you can browse to open Google Talk folder from MyComputer > C drive:
2. Right click on Google Talk icon and then click Send To > Desktop (create shortcut). A new shortcut to open Google Talk will be created on the desktop.

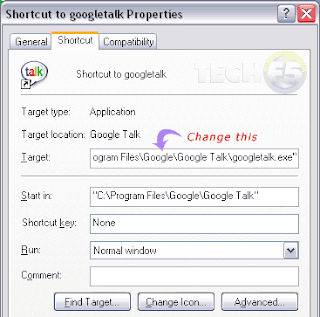
3. Right click on that newly create Google Talk icon on the desktop and click properties. You need to modify Target field in the Google Talk properties window.
Original – “C:\Program Files\Google\Google Talk\googletalk.exe”Change - ”C:\Program Files\Google\Google Talk\googletalk.exe” /nomutex
4. Click Apply, OK and start using multiple Gtalk application