Friday, September 18, 2009

Manually Update the Kaspersky Anti-Virus’s signature

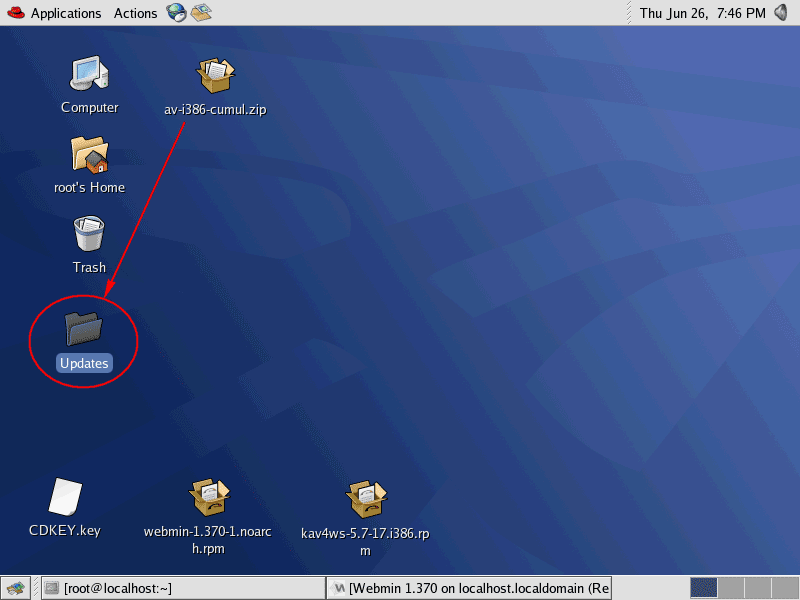
1. On Desktop, extract av-i386-cumul.zip to a folder. In this example, I extract all files to /root/Desktop/Updates/.
Extract the signature's file
2. Back to Webmin, click on KeepUp2Date in Other -> KAV 5.7 for UNIX WS.
Configure update on Webmin
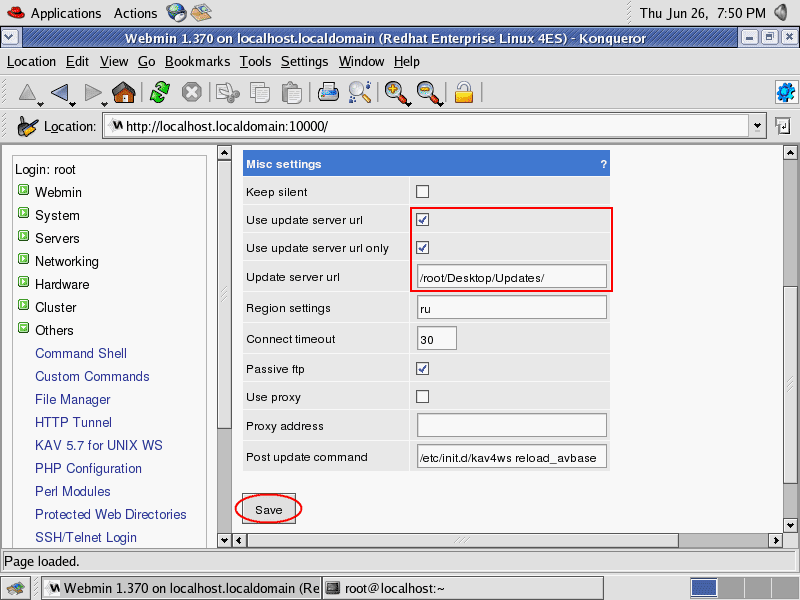
3. On KeepUp2Date menu, browse to misc settings. Check ‘Use update server url’ and ‘Use update server url only’ and change ‘Update server url’ to the folder where you have extracted the signature files. In this example, it is ‘/root/Desktop/Updates/’. And click Save.
Note: The ‘Update server url’ path must be follow with ‘/’.
Configure update path
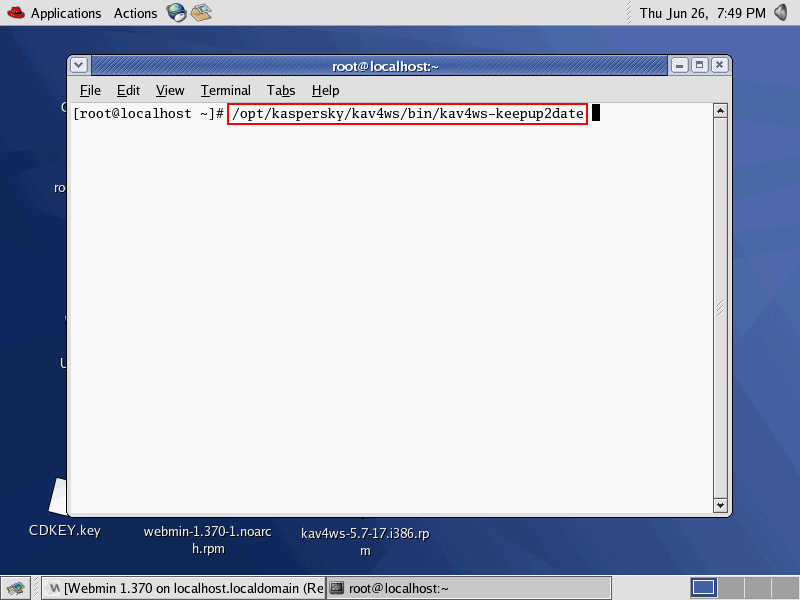
4. Open Terminal and type the command below to update the signature.
/opt/kaspersky/kav4ws/bin/kav4ws-keepup2date
Run keepup2date to update the signature
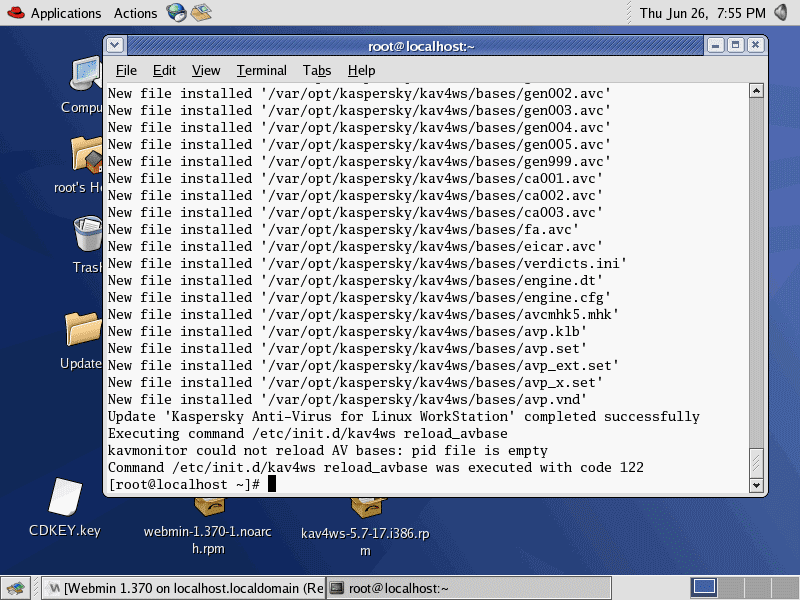
5. Waiting until the update is finished, you’ll see some error message because Kaspersky Anti-Virus hasn’t started yet.
The update is running
6. Now the signature is up-to-date. Browse to Key Info on Webmin again, the license info has been shown correctly.
Check license again to see if it shows correctly

Start the Kaspersky Anti-Virus On-Access Scanner

1. Before start Kaspersky Anti-Virus On-Access Scanner, you can configure how to handle when Kaspersky Anti-Virus found suspicious, infected files in ‘AV File Check’ and ‘AV File Monitor’. I’ll not cover in these configuration.
Configure Kaspersky Anti-Virus
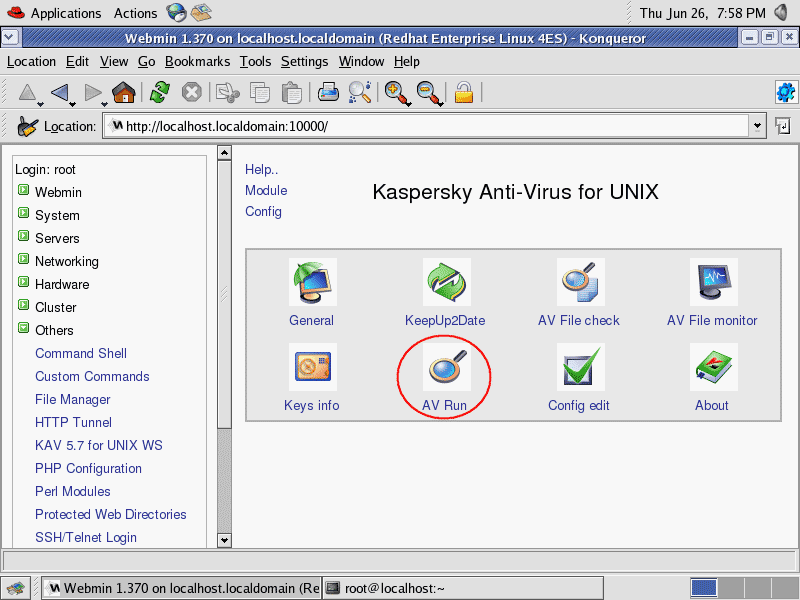
2. When you have finished configuration, next I’ll start Kaspersky Anti-Virus On-Access Scanner by click on ‘AV Run’.
Click 'AV Run'
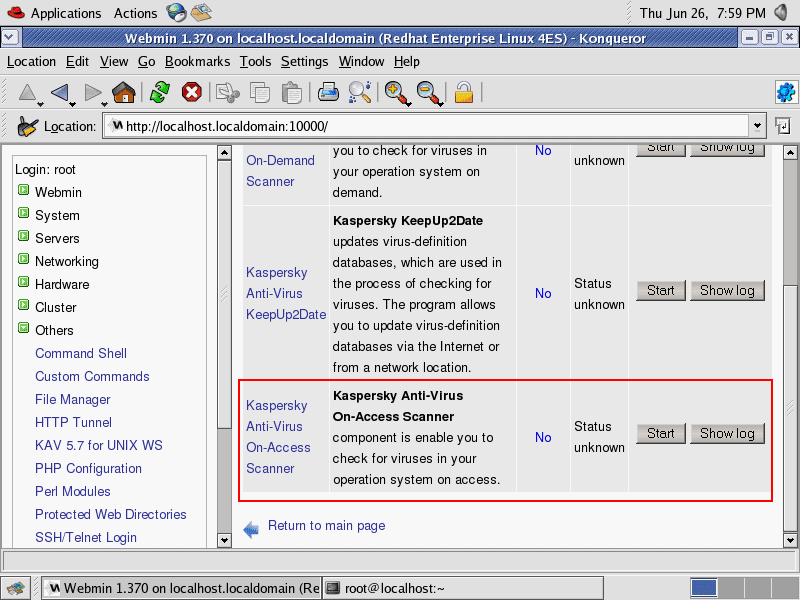
3. Browse to the bottom of the page, click ‘Start’ button on Kaspersky Anti-Virus On-Access Scanner.
Start Kaspersky Anti-Virus On-Access Scanner
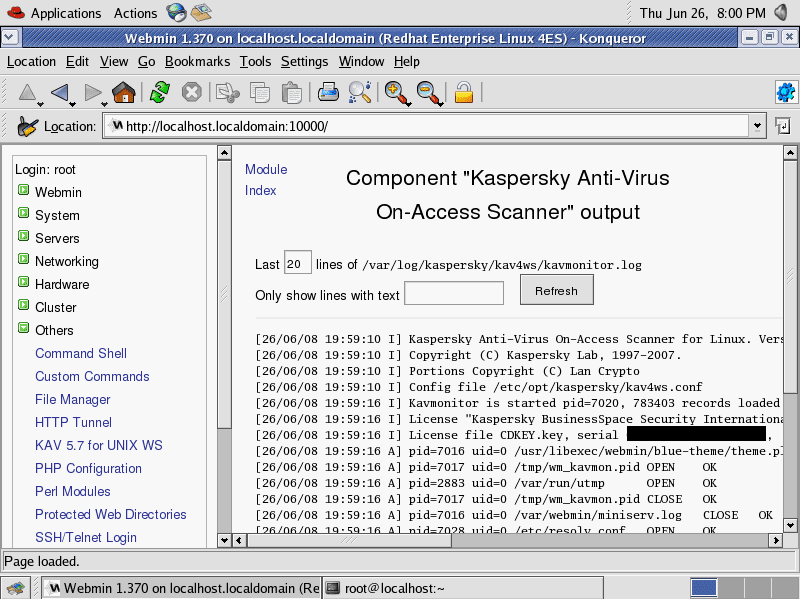
4. It’ll show Kaspersky Anti-Virus On-Access Scanner Output.
Kaspersky Anti-Virus On-Access Scanner has started
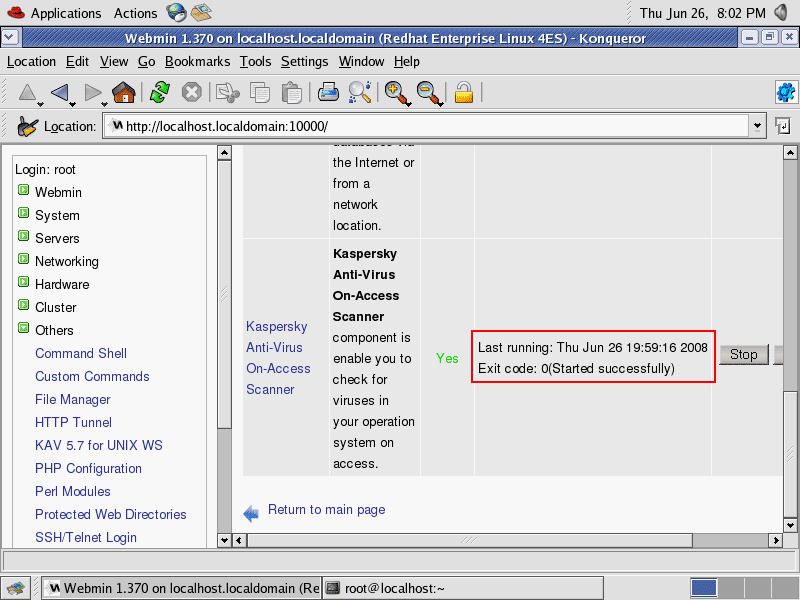
5. Back to ‘AV Run’, you’ll see the service status is started with no errors (Exit code:0).
Kaspersky Anti-Virus On-Access Scanner has started

Add cronjobs to run Kaspersky Scanner

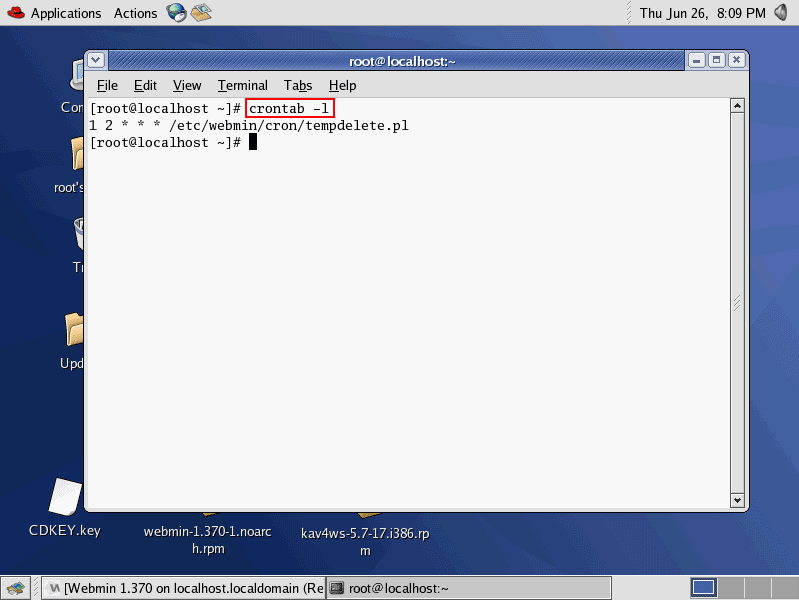
1. Open Terminal, type the command below to view current cronjobs.

crontab -1
Listing current cronjobs
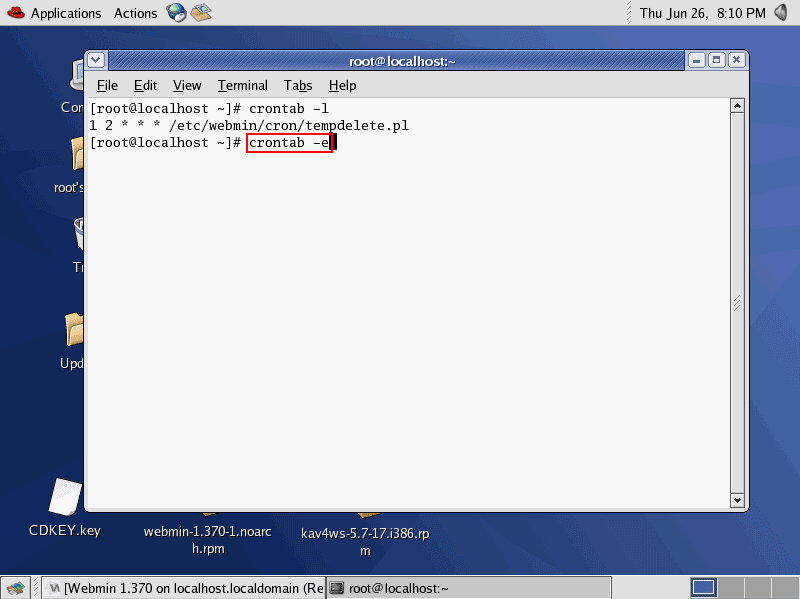
2. Type the command below to edit cronjob.

cronjob -e
Note: You can customize the frewuency to run these jobs by change the values. For more about crojobs, see Crontab – Quick reference.
Edit cronjobs
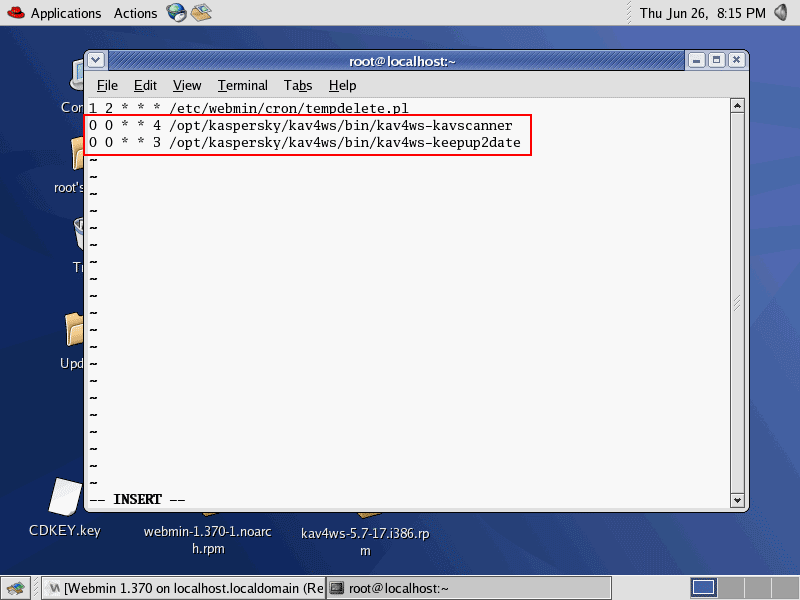
3. On the cronjob’s editor, add these 2 lines and save the file.

0 0 * * 4 /opt/kaspersky/kav4ws/bin/kav4ws-kavscanner
0 0 * * 3 /opt/kaspersky/kav4ws/bin/kav4ws-keepup2date
Add new cronjobs
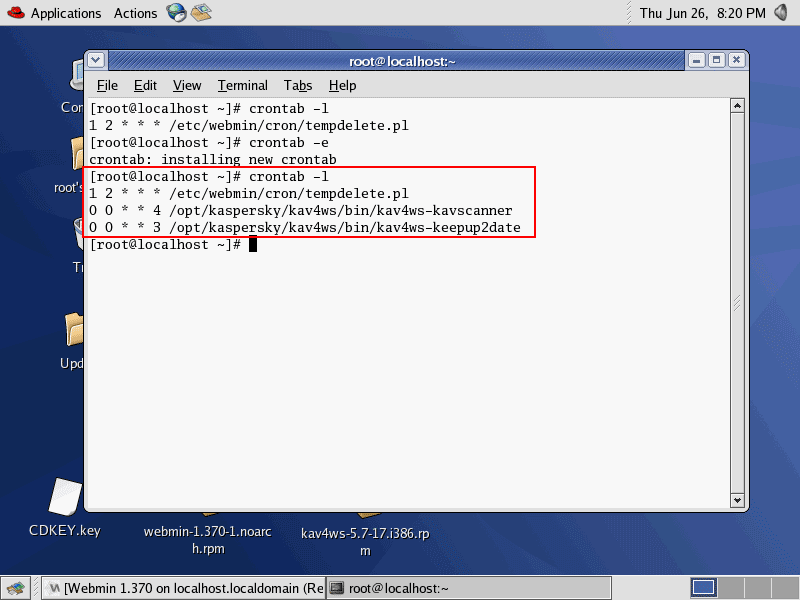
4. Review the cronjobs again by type the command.

crontab -l
Review cronjobs
5. Now you have finished configure cronjobs.

Summary:

Now I have Kaspersky Anti-Virus 5.7 Workstation on Linux RedHat. The routine that I need to do is to update the anti-virus’s signature regulary to ensure that the servers are safe from virus threats. For ease of management, you can extend by implement Kaspersky Administration console to manage Kaspersky’s product.

How to IP Address Configuration in Linux REDHAT

Introduction:

Most of the time, I work in Windows environment. But I sometimes have to work on Linux platform, too. So I decide to note it down this topic to remind myself.

There are many ways to change IP Address on Linux. First one is the easiest way that configure on GUI because it’s like on Windows platform. The second way is configure on command-line but it is only temporary, it’ll reload to the old configuration when the network service is restart. And the last one is also configure on command-line to change IP Address permanently.

Step-by-step:

Configure on GUI (Permanently)
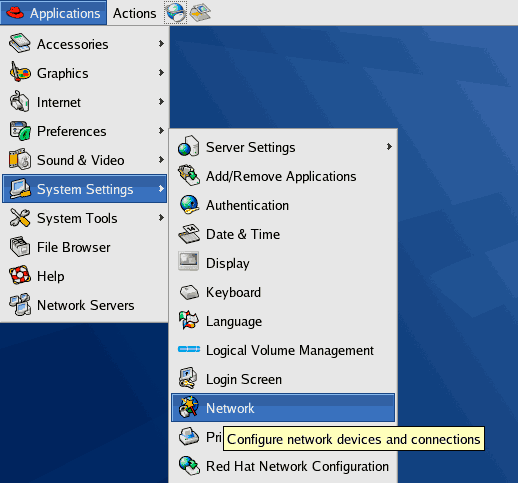
1. Select Application -> System Settings ->Network.
Open Network Configuration
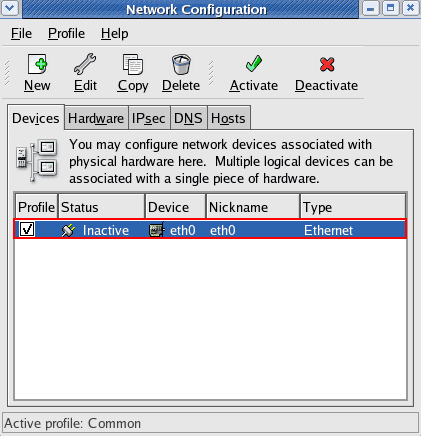
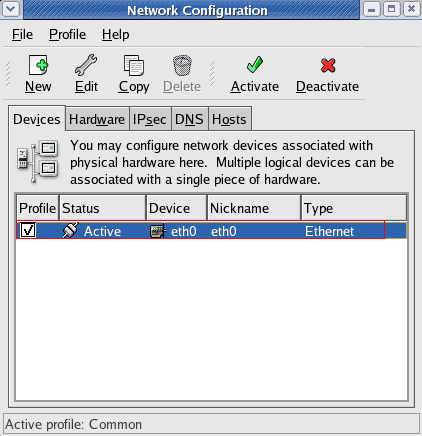
2. On Network Configuration and Devices tab, you’ll see available network card on the PC. In this example, the PC has 1 network interface card (NIC) and it’s currently inactive. Double click on the network interface card (NIC) that you want to configure to open its property.
Select a network interface card to configure
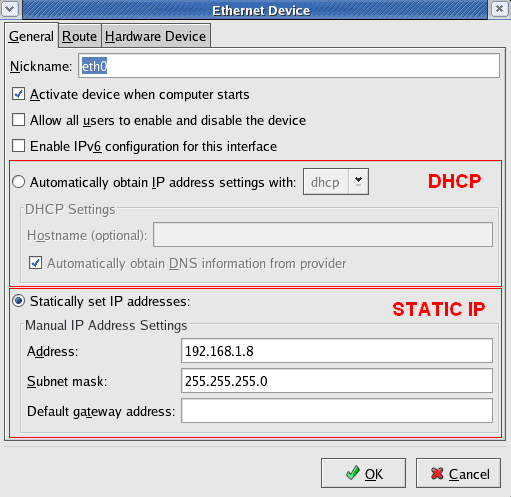
3. On Ethernet Device, you can configure the NIC to be either DHCP or static IP Address. When you finish, ClickOK
, Configure IP Address
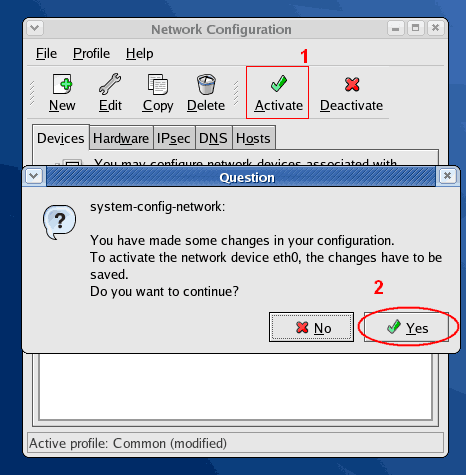
4. There is a pop-up message ask for activate the NIC. Click Yes to enable the NIC.
Activate the NIC
5. The NIC will be restarted to reload the new configurations and the NIC is active now.
The NIC is actived
Configure on commad-line (Temporary)

Note: This way change IP Address only temporary. When you restart network service, it’ll load from configuration file to replace this configuration.
1. Open Terminal.
2. Type
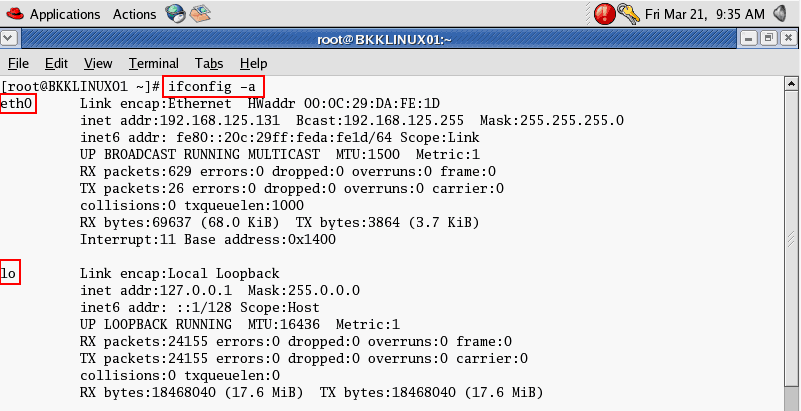
ifconfig -a
to list all network interface card on the current PC.
List all NICs on the PC
3. Type
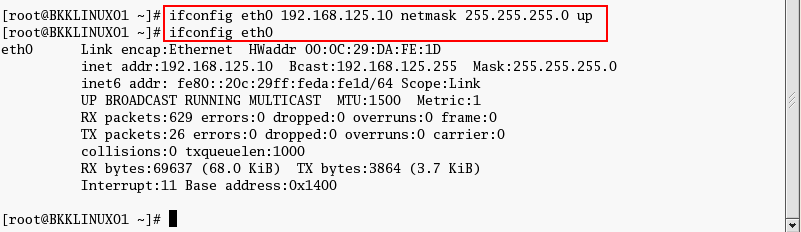
ifconfig eth0 192.168.125.10 netmask 255.255.255.0 up
to configure IP Address on interface eth0.
Change IP Address temporary
4. Note: To configure gateway, type
route add default gw [gateway address].

Configure on commad-line by edit configuration file (Permanently)

1. Open Terminal.
2. Open network configuration file. In this example, it’ll configure on interface eth0. Type

vi /etc/sysconfig/network-scripts/ifcfg-eth0

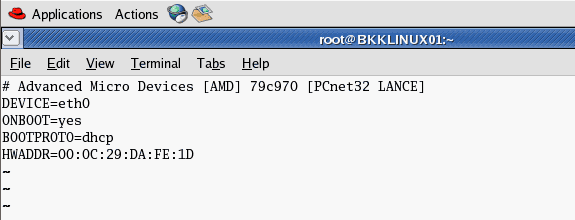
3. The current configuration is DHCP.
The NIC's configuration file
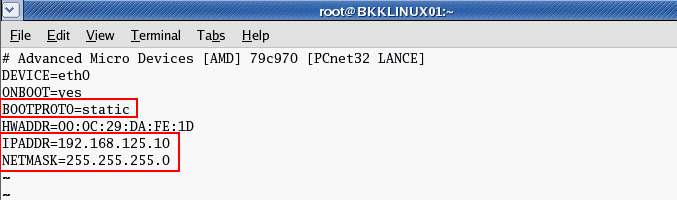
4. Modify the file by press ‘i’ to enter insert mode. Change BOOTPROTO to static and add IP Address and Net mask as new lines if they’re not existed yet..

BOOTPROTO=static
IPADDR=192.168.125.10
NETMASK=255.255.255.0

Save the configuration file by press ESC + ‘:’ and type ‘wq’ to write and quit the editor.
Edit the NIC's configuration file

5. You can added these configuration to the config file. Replace [number] with your actual value.

GATEWAY=[number]
TYPE=Ethernet
NETWORK=[number]
BROADCAST=[number]
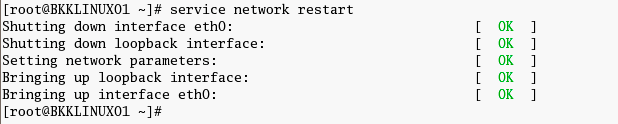
Restart the network interface card. Type
service network restart
Restart network service
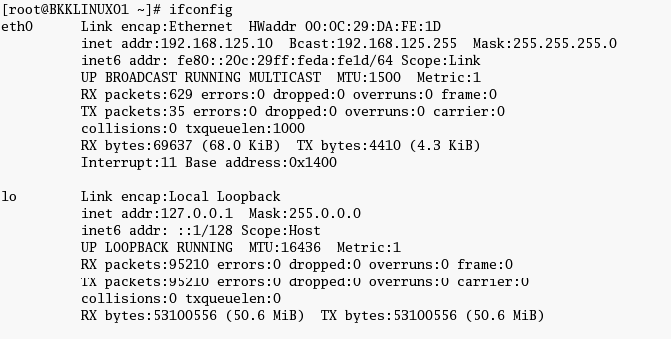
7. Review the configuration. Type
ifconfig

. The IP Address has been changed permanently.
List all NICs on the PC

"NETGEAR" Router Configuring.Guide:

Configuring WEP:

1. Connect a computer to any one of the four LAN ports of the NETGEAR router.
2. Open an Internet explorer and type the router IP address which would be either http://192.168.0.1 or http://192.168.1.1 (by default, refer to your product documentation ti determine the default IP address.) in the address bar and press Enter. The Login window will be prompting for a Username and Password. The default Username is admin and the default Password is password or (admin).
3. Click Wireless Settings under Setup menu.
NETGEAR Router WEP
4. Under Security Options, Select WEP (Wired Equivalent Privacy)
5. Select Authentication type as Automatic and Encryption Strength as 64-bit (or 128-bit) - You must later configure your wireless computers with the same setting.
6. Select Key 1 and enter any 10 hexadecimal digits - any combination of 0-9, A-F (26 digits if you selected 128-bit as the encryption strength) and Apply the settings. Please note down these values - You must later configure your wireless computers with the same setting.

Configuring WPA-PSK Encryption:

1. Connect a computer to any one of the four LAN ports of the NETGEAR router.
2. Open an Internet explorer and type the router IP address which would be either http://192.168.0.1 or http://192.168.1.1 (by default, refer to your product documentation ti determine the default IP address.) in the address bar and press Enter. The Login window will be prompting for a Username and Password. The default Username is admin and the default Password is password or (admin).
3. Click Wireless Settings under Setup menu.
NETGEAR Router WPA-PSK
4. Under Security Options, select WPA-PSK (Wi-Fi Protected Access Pre-Shared Key)
5. Enter a word or group of printable characters in the Passphrase box. The Passphrase must be 8 to 63 characters in length.
6. Click Apply.

Configuring Access Control List:

Note: Before you enable access control list, you need to know the MAC address (aka Physical address or Hardware address) of all your wireless computers. Once you enable access control list, any wireless client (card) with a MAC address not listed will NOT be allowed to connect with the router.

1. Connect a computer to any one of the four LAN ports of the NETGEAR router.
2. Open an Internet explorer and type the router IP address which would be either http://192.168.0.1 or http://192.168.1.1 (by default, refer to your product documentation ti determine the default IP address.) in the address bar and press Enter. The Login window will be prompting for a Username and Password. The default Username is admin and the default Password is password or (admin).
3. Click Wireless Settings under Advanced menu.
4. Click Setup Access List.
Image
5. Click on the Add button.
Image
6.Enter the a descriptive Device Name (like HallDesktop) and the MAC address of the wireless card, and click Add.
Image
7. Repeat the last 2 steps to add all wireless clients to the allowed list.
8 When you have completed adding all the wireless MAC address allowed to connect to wirelessly with your router, Check Turn Access Control On.
Image
Click Apply. Your settings will be saved and only the wireless clients with MAC address listed in the allowed list will be allowed to connect with your router.

How to Configure Your Mobile Phone As Wireless Modem

I just managed to setup my 02 Xda Zinc 3G mobile phone as a modem to replace the 3G datacard that costs around USD300. By either utilizing Bluetooth pairing or USB synchronous cable between the mobile phone and laptop, I can access the Maxis 3G network and then browse the Internet Explorer contents on the laptop. Some of the steps mentioned below may vary based on different telcos and mobile phone models, but most of them are still applicable while setting it up as wireless modem.

Step 1: Turn on Bluetooth at Your Handphone

At your 3G enabled phone, go to Setting -> Menu -> Connections, then click on Bluetooth icon. Turn on Bluetooth, set phone’s visibility to “Show to all” and name “your phone’s name” at your preference.

Step 2: Setup Bluetooth Device at Your Laptop

1. Click on Start -> Control Panel -> Bluetooth Devices. Click on Add.. and a pop-up Add Bluetooth Device Wizard would displayed.
2. Tick “My device is set up and ready to be found” checkbox and click Next.
3. The wizard now will auto search for any available Bluetooth device and display accordingly. Select the new device found and click Next.
4. You will come to passkey setup screen, please choose “Let me choose my own passkey” and enter your desire passkey and click Next.
5. You will see window is installing Bluetooth device. Once completed, you will be asking “Add to My devices?”, click Yes. Enter the same passkey that you have entered previously and press Ok. Please wait while laptop is installing the Bluetooth.
6. Click Finish to complete the Add Bluetooth Device Wizard.

Step 3: Setup New Connection at Your Laptop.

1. Go to Control Panel -> Network Connections, on the right panel click on Create a new connection.
2. You will see a New Connection Wizard window display, click Next.
3. There are few connection types display, please choose Connect to the Internet and click Next.
4. At this screen, please choose Set up my connection manually and click Next.
5. Please choose Connect using a dial-up modem and click Next.
6. At the Device selection screen, choose Modem – Bluetooth DUN Modem (COM21), then click Next.
7. Key in ISP name and click Next.
8.Key in ISP’s phone number and click Next. In this case for Maxis, key in *99#.
9. For Connection Availability, please tick Anyone’s use and click Next.
10. Enter your user name, password and confirm password then click Next.
11. You are now completing the new connection setup, tick “Add a shortcut to this connection to my desktop” checkbox and click Finish to close the wizard window.

Congratulation! You can now using this new connection to connect to internet by using your mobile phone as a modem.

Thursday, September 17, 2009

Microsoft WindowsNT 4.0b,TCP/IP Configuration Guide

To configure the TCP/IP Stack for MS WindowsNT 4.0(b), it is assumed that you have a network interface card installed and configured. If you do not, please consult the documentation from you network adapter to properly install and setup your NIC card.

You must be logged into the system with Administration Privileges.

After you are logged in it should bring up the desktop screen.
Double click on the My Computer icon on your desktop to open the My Computer window.
1.gif
From the My Computer window double click on the Control Panel icon.
2.gif
This opens the Control Panel window. Double click on the Network icon.

This opens the Network window.
4.gif
Select the Protocols tab.
prot_1.gif
Click on the Add button in the Protocols window. This will bring up the Select Network Protocol window.
prot_2.gif
Highlight the TCP/IP Protocol entry. Then click on OK.
prot_3.gif
Next, you will need to enter to path to the installation media. In this example the setup files are located on the D:\ drive (which is a CD-ROM drive).

After entering the path, click on Continue.

The files required to run the TCP/IP protocol are copied to the hard drive.
prot_4.gif
At this point the TCP/IP Protocol will show up as a protocol in the Network Protocols window.
prot_5.gif
Click on the Properties button.
The Microsoft TCP/IP Properties window displays.
Select the IP Address tab.
prot_6.gif
Choose Specify an IP address.
prot_7.gif
In the IP Address box enter your assigned CIDR network number.
For example: 199.97.124.128

The IP address must be unique on your network (and to the Internet as well). (Keep in mind that the router in general has already been assigned the .1 host IP address.)

Enter 255.255.255.0 in the Subnet Mask box for an unsubnetted Class C network.
Enter the IP address of your router in the Default Gateway box.
Select the DNS tab.
prot_8.gif
In the Host Name box enter the DNS hostname of this workstation. (This should be a unique name chosen by you to refer to this machine.)

Enter your InterNIC registered DNS domain name in the Domain box.
Click on the Add button in the DNS Service Search Order section.
prot_9.gif
Add the IP addresses of the DNS resolvers. Please choose the IP address of the two closest machines.
Enter the first resolver IP address in the TCP/IP DNS Server box, then select Add.
Repeat the process so that you have two IP addresses in the DNS Service Search Order box.
prot_10.gif

WINS Address
Nothing needs to be changed on this page.

DHCP Relay
Nothing needs to be changed on this page.

Routing
If this machine is on two segments (multihomed), you can select Enable IP Forwarding to route between the two networks. Otherwise, leave it disabled.

Save Your Changes:

Make sure that you select OK. This will return you to the Network window.
prot_5.gif
You must click on the Close button on the Network window for changes to take effect.

If you do not press OK on the TCP/IP protocol control panel AND Close on the Network control panel, your changes will not be saved!

You will be prompted to restart now. Answer Yes.
If you are not prompted to restart, then the changes were not picked up.
restart.gif