Saturday, September 19, 2009

Getting started with Microsoft ISA Server 2006, Part III: Create Firewall Policy Rule

Firewall Policy:

From part II, you have configured Network Topology. Now you need to create a policy rule to allow traffic pass through the ISA Server.

By default, ISA Server is configured with default rule which blocks all traffics pass through ISA Server. But you can customize rules to match your policy in organization. On each rule, you can customize to allow or deny access, protocols, source and destination addresses, users (ISA Server can integrated with Active Directory), time to use the rule, content types.

Step-by-step:

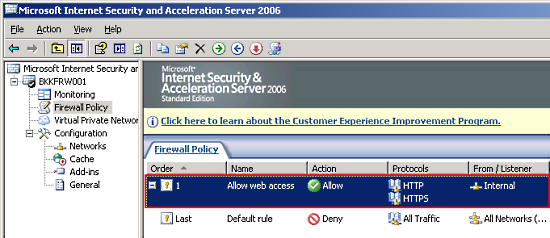
Next, I will create a new web access rule for all users in internal network to access internet(external network) with only HTTP (port 80) and HTTPS (port 443) protocols.

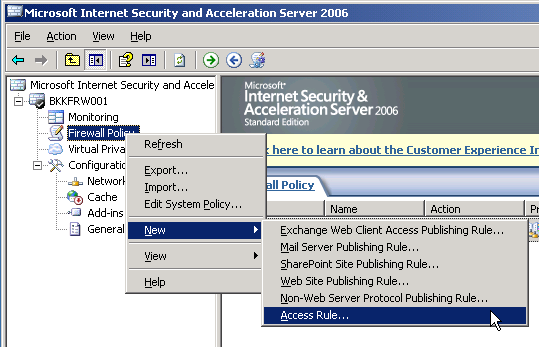
1. Open ISA Server Management. Expand server name(in this example, BKKFRW001) -> Right click on Firewall Policy -> New -> Access Rule.
New Access Rule
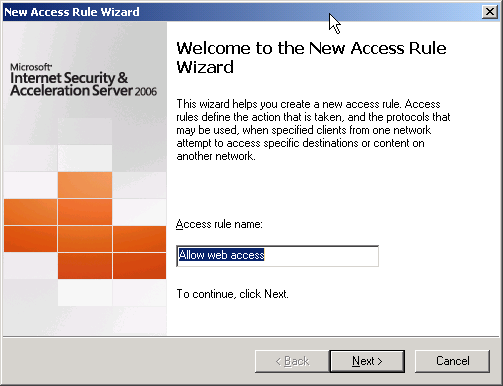
2. New Access Rule Wizard appears, enter the name of access rule. Click Next.
New Access Rule Wizard
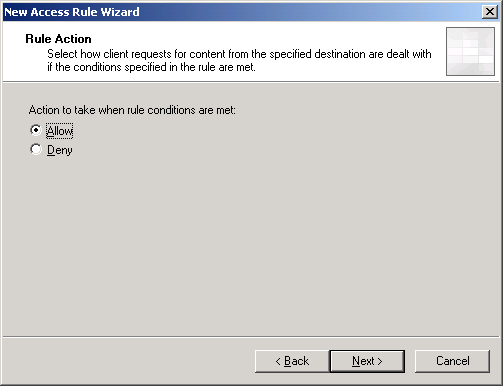
3. On Rule Action, select Allow. Click Next.
Rule Action
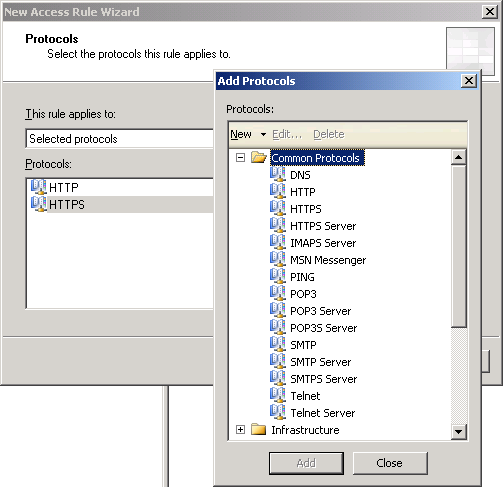
4. On Protocols, click Add. Add Protocols window appears, expand Common protocols and select HTTP and HTTPS.
Protocols
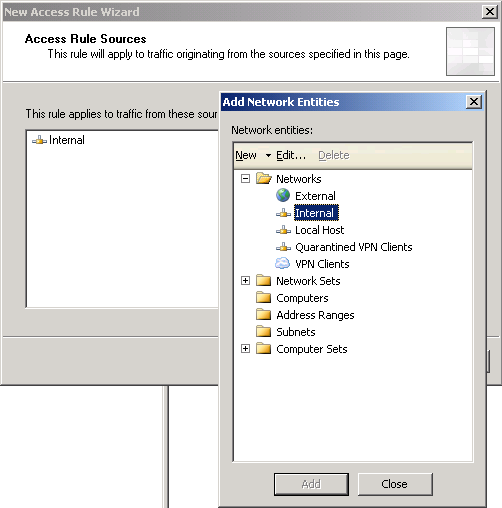
5. On Access Rule Sources, click Add. Add Network Entities window appears, expand Networks and select Internal.
Access Rule Sources
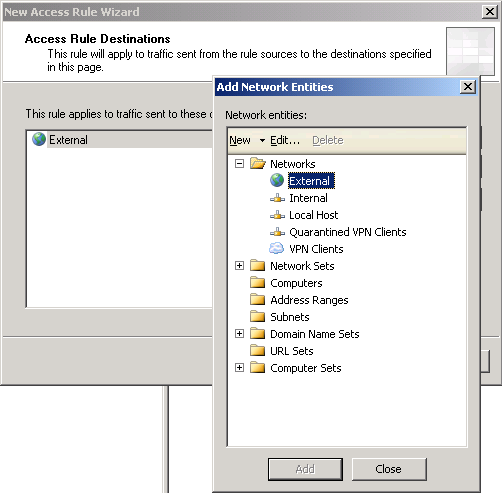
6. On Access Rule Sources, click Add. Add Network Entities window appears, expand Networks and select Internal.
Access Rule Destinations
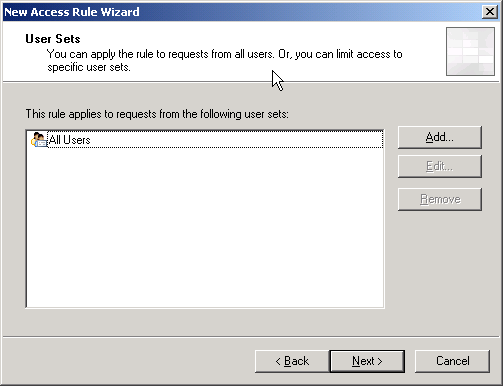
7. On User Sets, leave All Users. Click Next.
User Sets
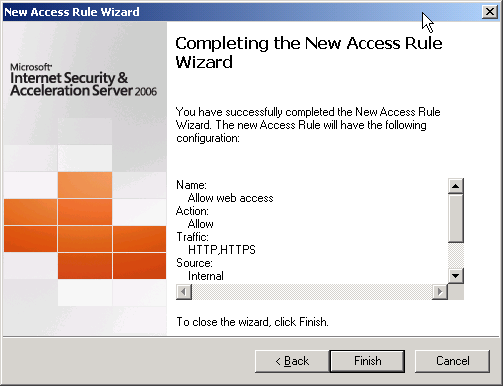
8. Click Finish to complete create new rule.
Completing the New Access Rule Wizard
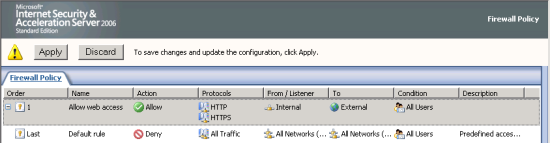
9. Again, don’t forget to apply your setting on ISA Server to take effect. Click Apply.
Click Apply to take effect

10. Next part will be about client configuration to access to ISA Server.

Getting started with Microsoft ISA Server 2006, Part IV: Configure Client Type

Introduction:

After completed part III, you have done basic configurations on ISA Server. In this part, you’re going to configure on client computer to be one of these types: SecureNAT Client, Firewall Client or Web Proxy Client. You can see more detail in topic below.

Client Types:

The table below compares the ISA Server clients.

Feature\ Client typesSecureNAT clientFirewall clientWeb Proxy client
Installation requiredSome network configuration changes may be requiredYesNo, Web browser configuration required
Operating system supportAny operating system that supports Transmission Control Protocol/Internet Protocol (TCP/IP)Only Windows platformsAll platforms, but by way of Web application
Protocol supportApplication filters for multiple connection protocols requiredAll Winsock applicationsHypertext Transfer Protocol (HTTP), Secure HTTP (HTTPS), File Transfer Protocol (FTP), and Gopher
User-level authenticationSome network configuration changes requiredYesYes
Server applicationsNo configuration or installation requiredConfiguration file requiredNot applicable


Configurations:

On this section, I will how to configure each client type on a client computer. You only select one of these three client types configurations.

1. SecureNAT clientTo configure SecureNAT client, only change gateway in network properties to ISA Server
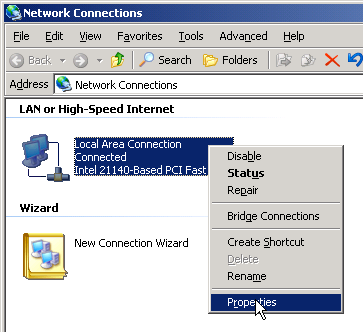
* Open Network Connection Properties on client computer.
Network Connections
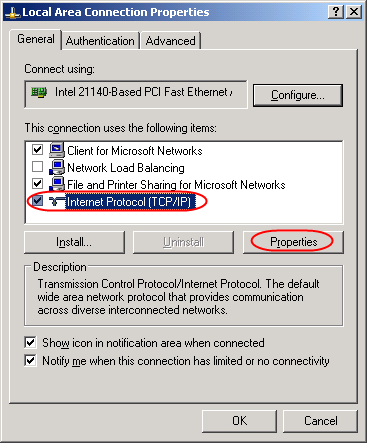
* On Network Properties, select Internet Protocol(TCP/IP) and click Properties.
Select TCP/IP Properties
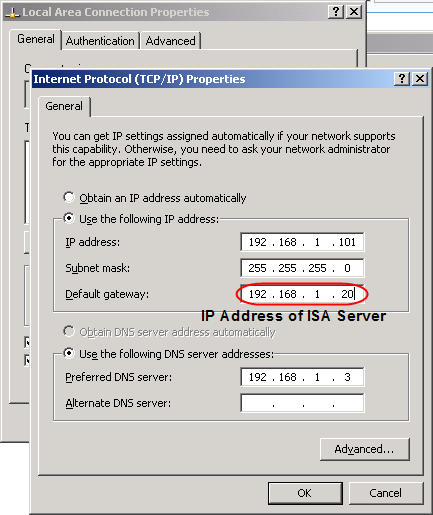
* On Internet Protocol(TCP/IP) Properties, change IP Address on default gateway to ISA Server.
Assign ISA Server's IP Address on Default Gateway
2. Firewall client
* Download Firewall Client for ISA Server at Microsoft or at here – Microsoft Firewall Client.
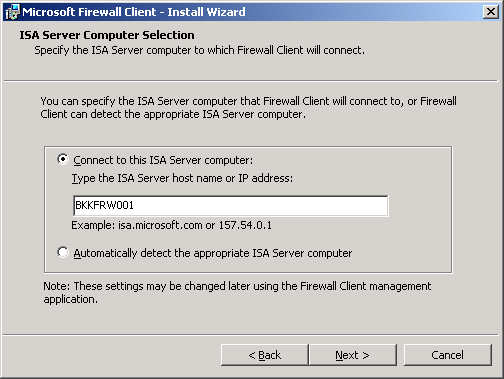
* Run setup program, set the ISA Server DNS name or IP Address on ISA Server Computer Selection page.
Type ISA Server name
* After install, you’ll see icon as the figure below in task icon. The green color means the client has successfully connected to ISA Server. If the red shows, the client can’t connect to ISA Server. You can double-click on icon to see more detail.
Microsoft Firewall Client's icon
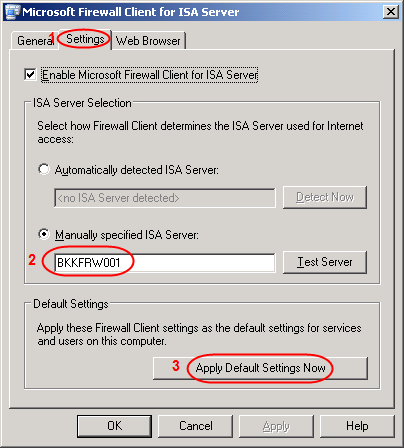
* If you have double-clicked on previous step, select Settings tab and you can verify that ISA Server Selection is type correctly or not. Also, click on Apply Default Settings Now for other users on this computer can use this configuration,too.
Apply Default Settings
3. Web Proxy client
* Web browser. In this example, I demonstate on Internet Explorer.
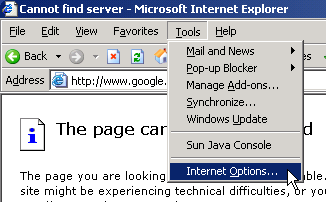
* On menu bar, select Tools -> Internet Options.
Open Internet Options in Internet Explorer
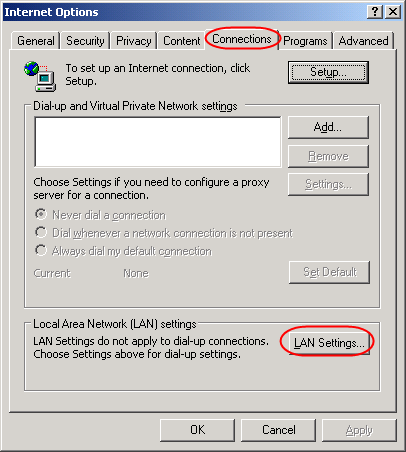
* On Internet Options, select Connections tab and click on LAN Settings.
Click on LAN Settings in Connections tab
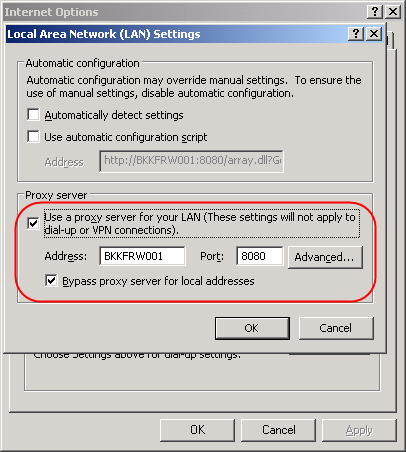
* On Local Area Network (LAN) Settings, set Address and Port to your ISA Server configuration.
Note: By default, Web proxy port is 8080.
Type proxy server to ISA Server

Getting started with Microsoft ISA Server 2006, Part V: Configure HTTP Filter

Getting started with Microsoft ISA Server 2006, Part V: Configure HTTP Filter
ISA, Security
Have you ever need to block users using MSN or Yahoo Messenger? Or block them to using free email services? Or even block them to post anythings on web boards? Or block them to using bit torrent to download files? This topic can answer these questions by using Microsoft ISA Server 2006.

From Part I to IV, you have finished simple configurations on Microsoft ISA Server 2006 to work in your network. But ISA Server can do a lot more than that. Another benefit of ISA Server is that it can filter HTTP traffic. If you know attributes of each HTTP traffic, you can block MSN/Yahoo Messenger, Bit torrent, web mail, disallow post on web boards, etc by allow or block HTTP traffic using HTTP filter. I think most of the readers may not familiar what HTTP traffic look like so let’s see about HTTP traffic in the next section.

Note: This topic isn’t require in order to running ISA Server, only Part I to IV are sufficient. But this topic will be benefits in most organization to improve security.

HTTP Traffic:

HTTP Traffic on ISA Server is a data that pass through ISA Server using HTTP protocol (by default is on port 80) which is the protocol that is used by most applications. On each HTTP connection, there will be a header information about client that send to server or server to client. These information are such as Request Methods (GET, POST ,etc.), HTTP Versions (1.0,1.1,1.2), User-Agent (Mozilla/4.0, Firefox, etc.), Content-Type (application/xml, image/jpeg, text/xml, etc.), etc. I will not go into deep detail about HTTP protocol if you want more information, you can find at Wikipedia – HTTP. With these header information, ISA Server can filter HTTP traffic to allow or block specific application or traffic.

To see some sample of HTTP traffic, you can use sniffer program to capture each data packet that pass in/out a computer. The popular one is Ethereal. I have installed Ethereal on a computer which running a web server. Let see the different example of each HTTP header information below.

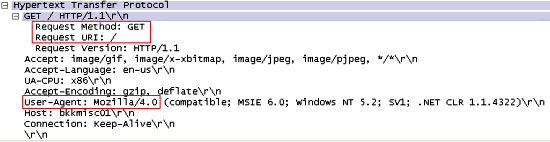
When client sends request to the web server by browser the Internet Explorer to http://bkkexternal (bkkexternal is the computer that runs a web server).Detail: The request method is GET. URI is /. The User-Agent is Mozilla (compatible: MSIE 6.0).
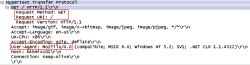
Example packet - HTTP Request, GET Method
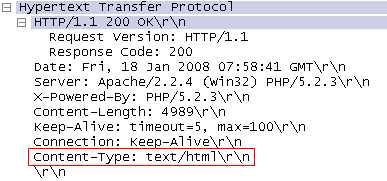
This the response header from the above request.Detail: The response code is 200 (OK). The server is running by Apache 2.2.4. The Content-Type is text/xml
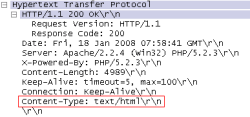
Example packet - HTTP Response, Content-Type is text/html
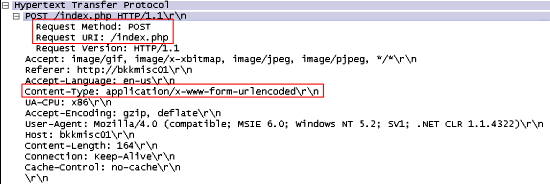
When you submit a form on the browser to the web server.Detail: The request method is POST. The client host is bkkmisc01. The Content-Type is application/x-www-form-urlencoded.
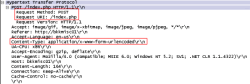
Example packet - HTTP, POST Method

Note: “/r/n” is tag that tells end of a line, a control line feed.

Configurations:

To configure HTTP filter, you need to know what attribute and value need to be configured. On this post, I will show only the following:

1. Block specific browser: Firefox.
2. Block MSN Messenger, Windows Live Messenger.
3. Block download file .torrent.
4. Block AOL Messenger.
5. Block Yahoo Messenger.
6. Block Kazaa.
7. Block free web mail. (e.g. hotmail.com, mail.yahoo.com, etc.)
8. Block post on web boards.

Step-by-step:

1. Open Microsoft ISA Server Management Console.
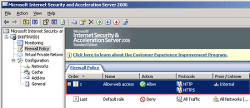
Microsoft ISA Server Management Console
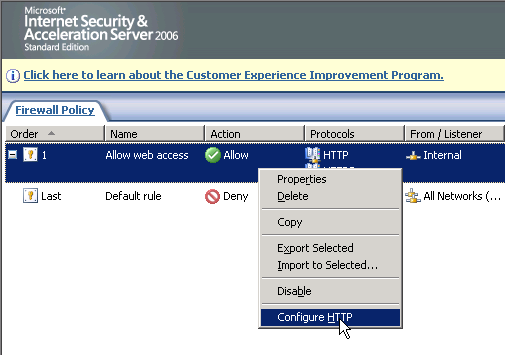
2. Right-click on the rule that being configured HTTP filter -> select Configure HTTP.
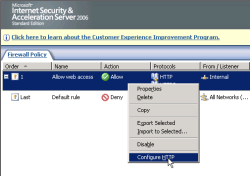
Configure HTTP filter
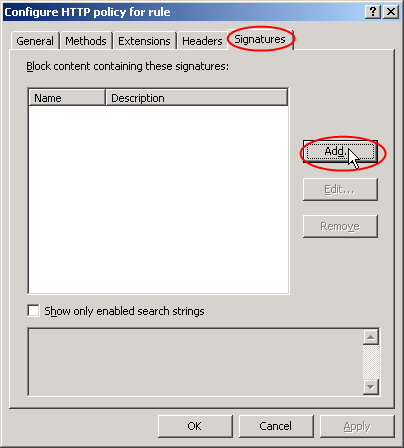
3. Click on Signatures tab and click Add.
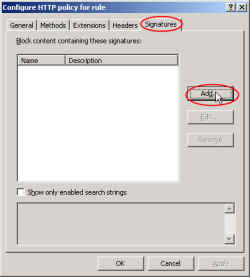
HTTP filter - Signature tab
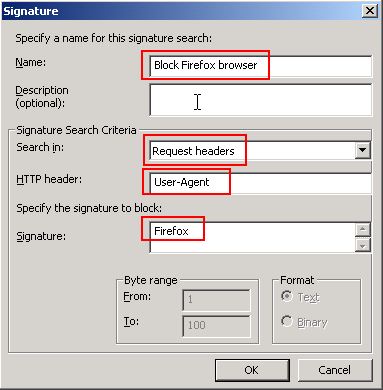
4. Block specific browser: Firefox.To block users to use Firefox browser by configure signature to “Firefox”, “User-Agent” in HTTP Header and Request headers in Search in.
Block Firefox
5. Block MSN Messenger, Windows Live Messenger.To block users to use MSN Messenger and Windows Live Messenger.
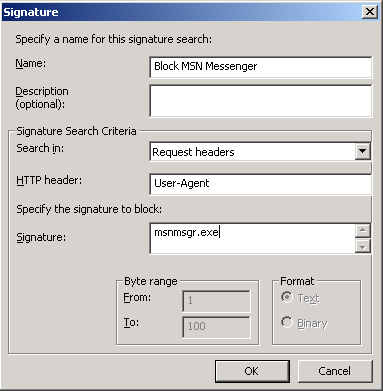
*To block MSN Messenger by configure signature to “msnmsgr.exe”, “User-Agent” in HTTP Header and Request headers in Search in.
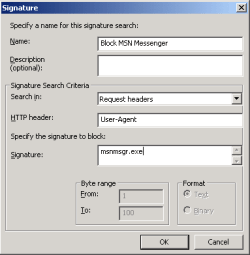
Block MSN Messenger
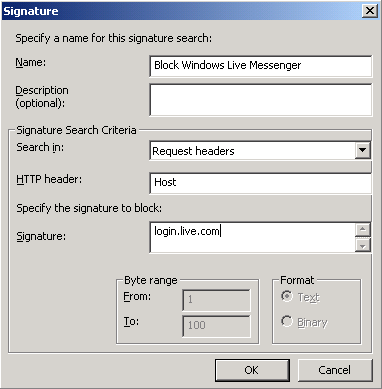
*To block Windows Live Messenger by configure signature to “login.live.com”, “Host” in HTTP Header and Request headers in Search in.
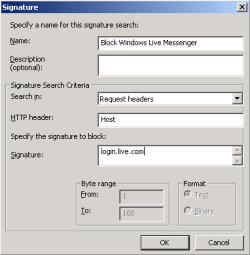
Block Windows Live Messenger
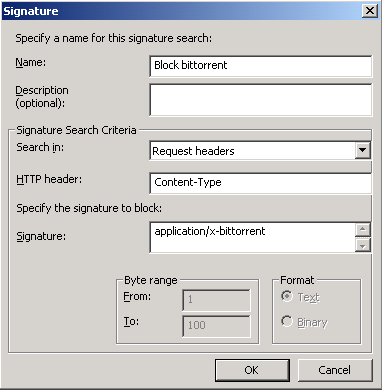
6. Block download file .torrent.To block download any .torrent files by configure signature to “application/x-bittorrent”, “Content-Type” in HTTP Header and Request headers in Search in.
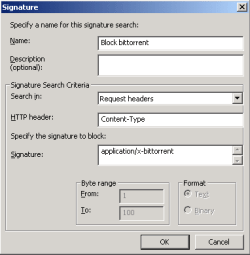
Block .torrent file
7. Block AOL Messenger.To block users to use AOL Messenger by configure signature to “Gecko”, “User-Agent” in HTTP Header and Request headers in Search in.
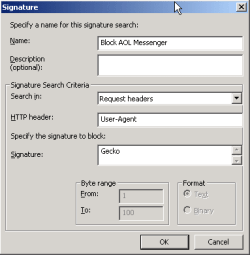
Block AOL Messenger
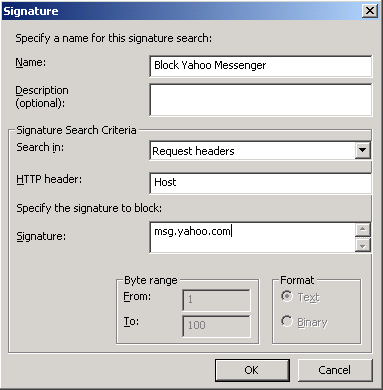
8. Block Yahoo Messenger.To block users to use Yahoo Messenger by configure signature to “msg.yahoo.com”, “Host” in HTTP Header and Request headers in Search in.
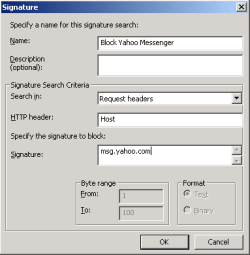
Block Yahoo Messenger
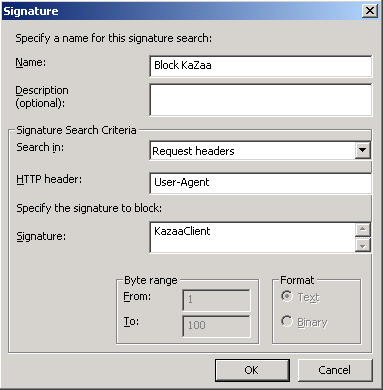
9. Block Kazaa.To block users to use Kazaa by configure signature to “KazaaClient”, “User-Agent” in HTTP Header and Request headers in Search in.
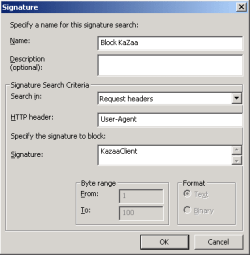
Block Kazaa
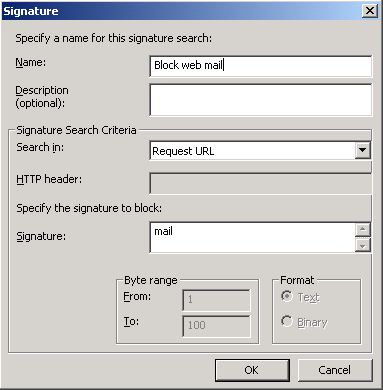
10. Block free web mail. (e.g. hotmail.com, mail.yahoo.com, etc.)To block users to access free web mail, block any URL that contain string “mail” by configure on signature to mail.
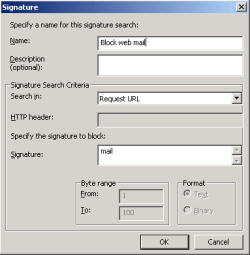
Block free web mail
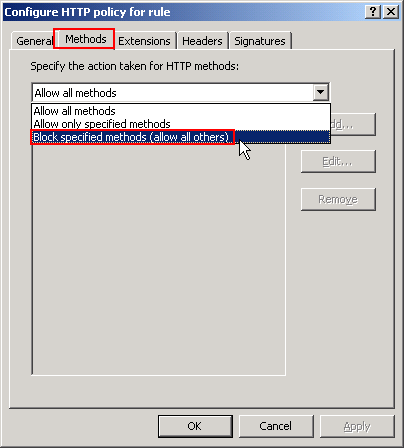
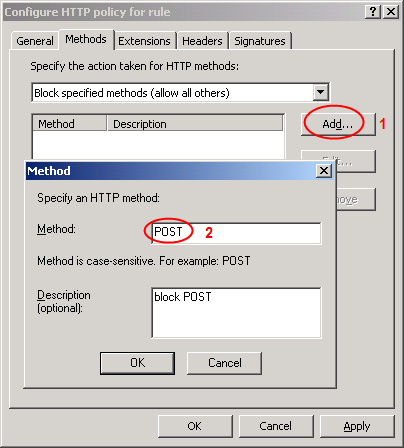
11. Block post on web boards.Block users to sending any information to internet (e.g. post on web board) by configure to disallow HTTP method: POST.

* Select on Methods tab and select block specified methods.
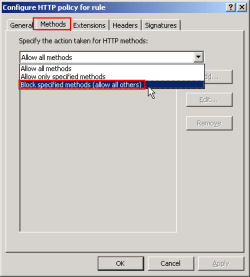
select block specific methods
* Click Add. New window appears, type “POST” on method and enter some description
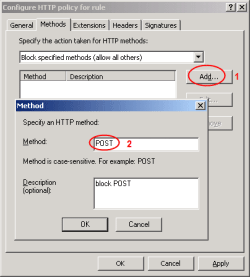
Block POST method
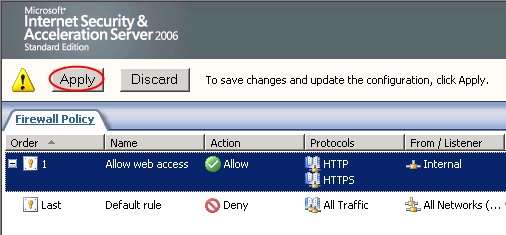
* Don’t forget to apply the settings after configuration
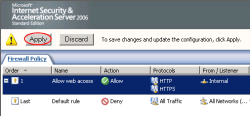
Apply the settings
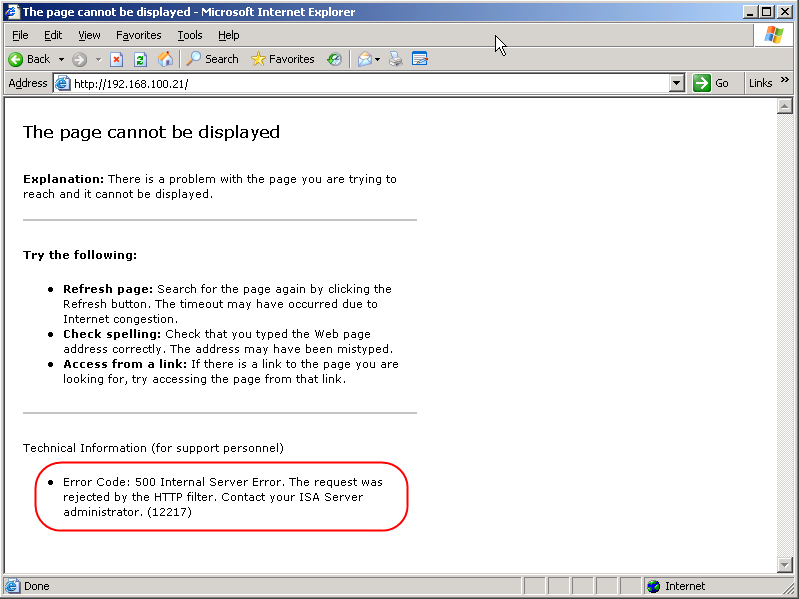
12. If the users are blocked by HTTP filter, they will see page like the figure.“Error Code: 500 Internal Server Error. The request was rejected by the HTTP filter.”
The blocked page

Summary:

This is the end of this serie. After complete this serie, starting from install ISA Server, configure the network topology, configure basic rule, configure client types and configure HTTP filter, now you have basic knowledge and understanding how to operate ISA Server on your own. But there are some configurations, I don’t cover for instance how to configure cache on ISA Server, how to implement VPN, etc. If you need more information, try visit ISA Server.org

I think these tutorials may be useful for starter who want to implement Microsoft ISA Server 2006 or some administrators who want to reviews configurations. If you have any problems or any suggestion, feel free to leave some comment below.
Friday, September 18, 2009

Install Webmin on Linux RedHat Enterprise 4

How to setup Stand-Alone Kaspersky Anti-Virus 5.7 Workstation on Linux RedHat

Introduction:

Kaspersky Anti-Virus is now one of the popular anti-virus softwares. The strong point are that it can detect and clean most of virus, light weight – it consumes less system resource comparing with other anti-virus softwares and Kaspersky’s signature is updated regularly (about every 2 hours).

Today, I have to setup Kaspersky Anti-Virus for Linux Workstation on a RedHat Enterprise 4. But in my environment, I can’t update signature from the Internet directly because it’s a separated network. So I have to manually update the signature myself. And I’ll install only few servers so there’s no need to install administration console for centralize management Kaspersky’s product. Therefore, I’ll not install Kaspersky Network Agent.

This article, I’ll show how to install Kaspersky Anti-Virus 5.7 on Linux RedHat Enterprise 4 by starting from install Webmin first. Then, I’ll install Kaspersky Workstation 5.7 and update the signature manually. Finally, I’ll add cronjobs to perform a scanning every week.

Note: Webmin is a web-based interface for system administration for Unix which will be used for configure Kaspersky Workstation.

Section:

1. Install Webmin on Linux RedHat Enterprise 4
2. Install Kaspersky Anti-Virus Workstation 5.7 on Linux RedHat Enterprise 4
3. Manually Update the Kaspersky Anti-Virus’s signature
4. Start the Kaspersky Anti-Virus On-Access Scanner
5. Add cronjobs to run Kaspersky Scanner

Step-by-step:

Install Webmin on Linux RedHat Enterprise 4:

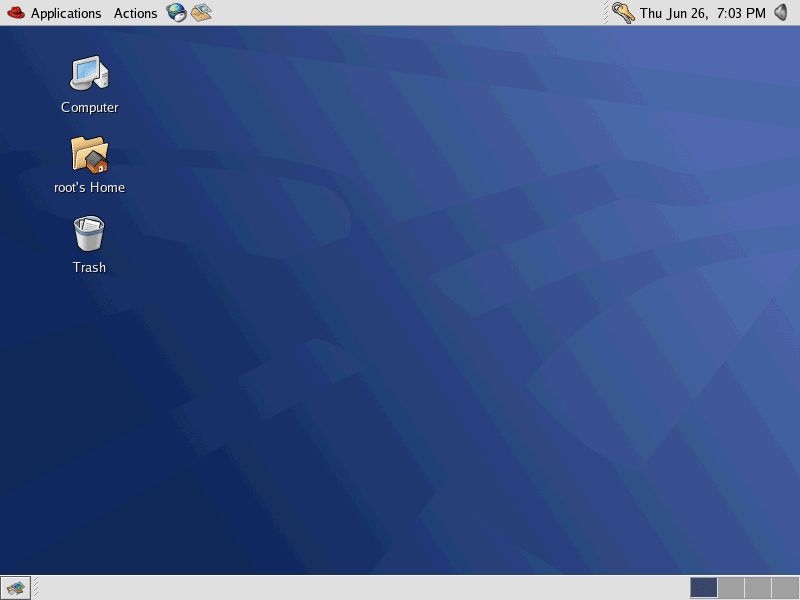
1. Login as ‘root’ on Linux RedHat Enterprise 4 server. You may be logged in as other user and use ’su’ command to execute as ‘root’.
Root's desktop
2. Insert Kaspersky’s CD on the server. I got it from Kaspersky’s vendor. Copy these .rpm files to local server.
* Webmin: webmin-1.370-1.noarch.rpm
* Kaspersky Workstation 5.7 for Linux: kav4ws-5.7-17.i386.rpm
* Kaspersky’s CDKey: CDKEY.key
* Kaspersky’s signature: av-i386-cumul.zip

Note: For webmin, you can find one at www.webmin.com. For av-i386-cumul.zip, you can find the latest signature one at kaspersky.com.
Prepare files for installation
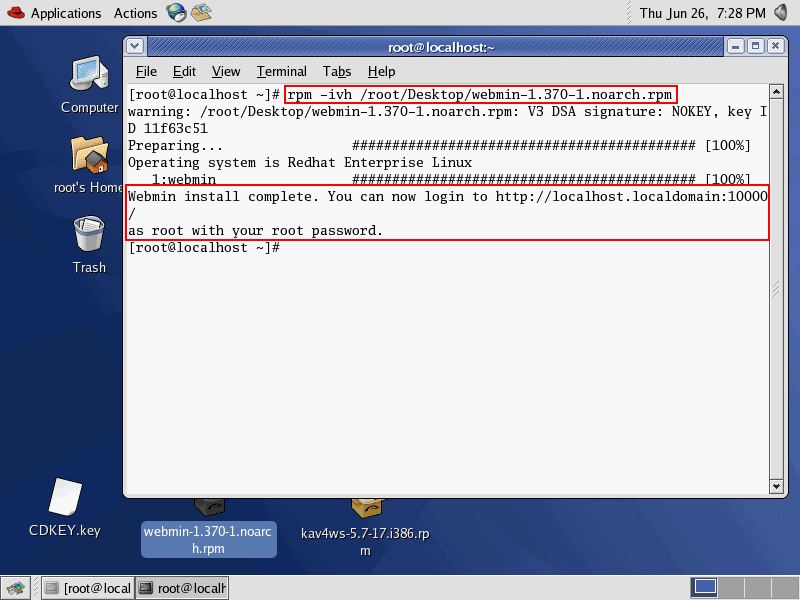
3. Open Terminal by right click on any space on the desktop and select Open Terminal. Type the command below to install Webmin.
rpm -ivh /root/Desktop/webmin-1.370-1.noarch.rpm
When the installation finishes, it’ll show how to open Webmin as in the figure. In this example, it tells I can open Webmin by browse to http://localhost.localdomain.com:10000 and login using ‘root’ account.
Install Webmin
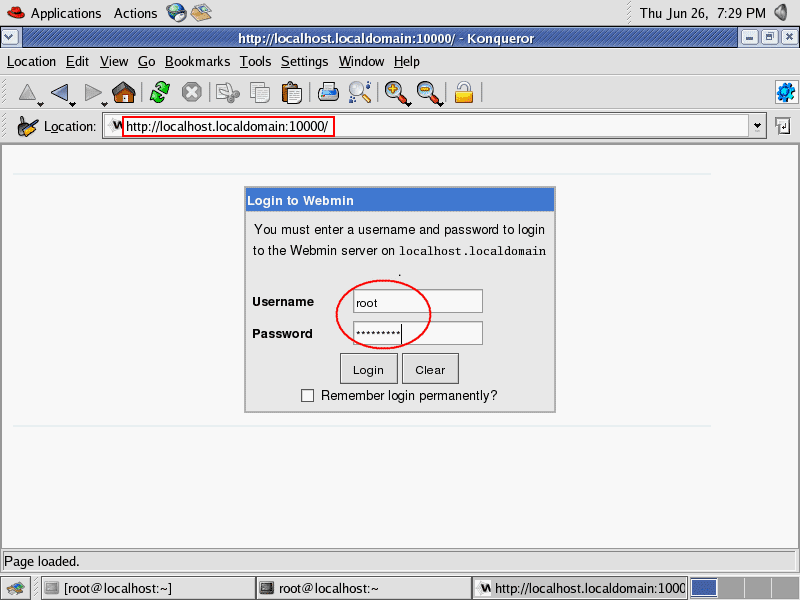
4. Test if you can access Webmin by open the browser and enter the url that you get from the last step. It’ll ask for user account for Webmin server. Enter your account user and password.
Login to Webmin webpage
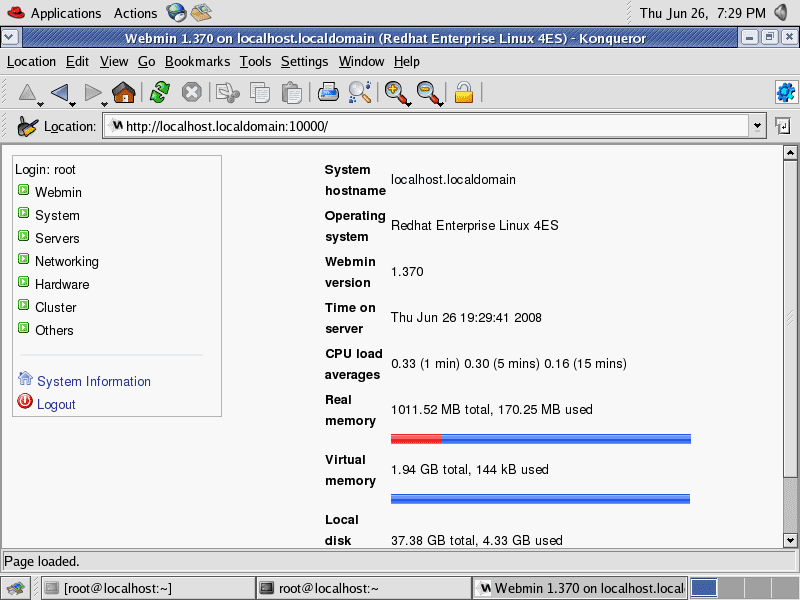
5. Now you’ll see the main page of Webmin. The Webmin has been installed successfully.
Webmin's Main page

Install Kaspersky Anti-Virus Workstation 5.7 on Linux RedHat Enterprise 4

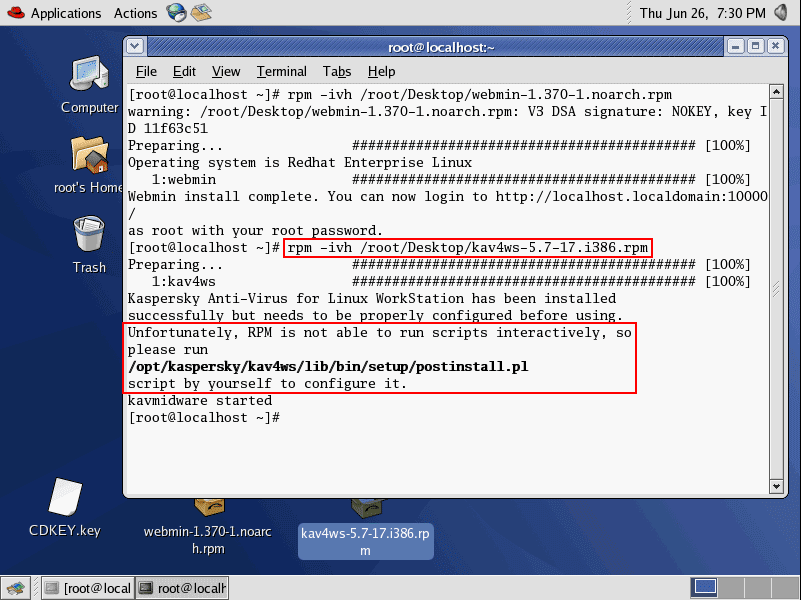
1. Back to Terminal. Type the command below to install Kaspersky Workstation 5.7.
rpm -ivh /root/Desktop/kav4ws-5.7-17.i386.rpm
When the installation finishes, it recommends you to run postinstall.pl to configure Kaspersky Anti-Virus.
Install Kaspersky Workstation 5.7
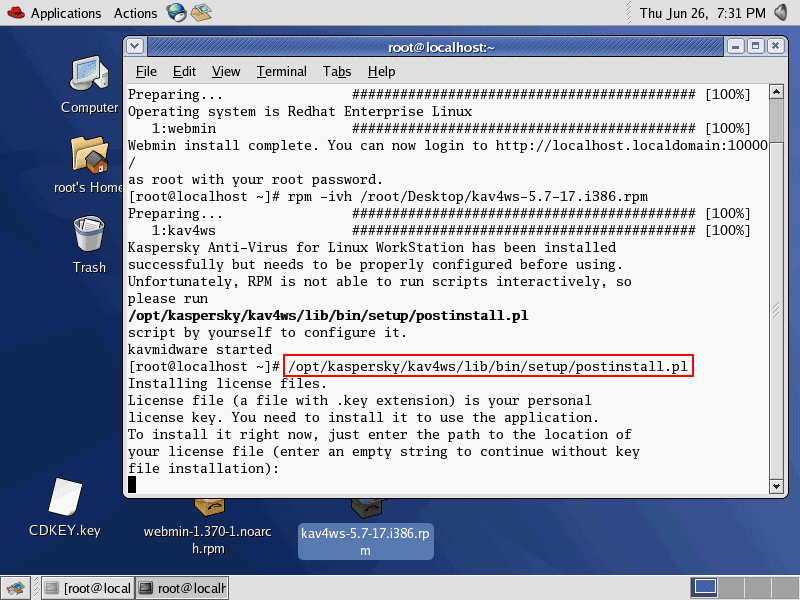
2. Run postinstall.pl to configure it by type the command below.
/opt/kaspersky/kav4ws/lib/bin/setup/postinstall.pl
Execute postinstall.pl
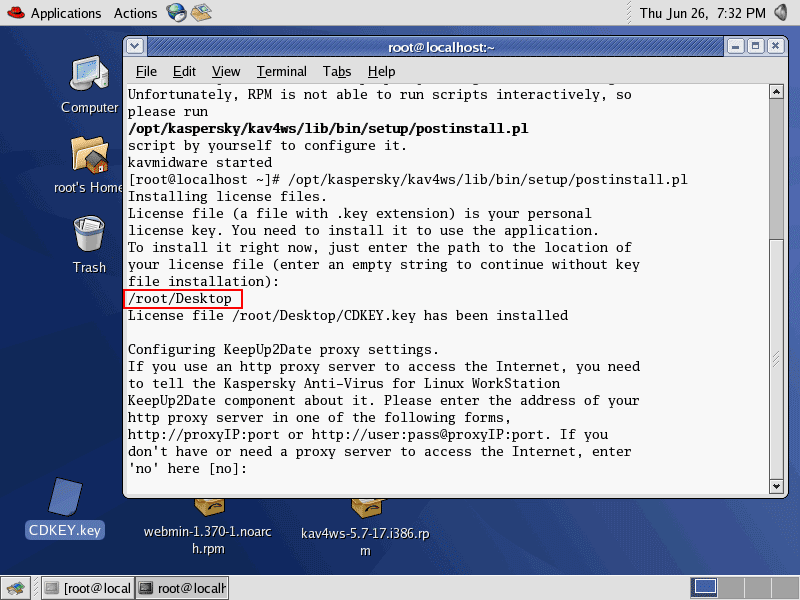
3. The first thing that the configuration asks is the license key of Kaspersky. You can obtain this file from Kaspersky by buying the product. Type only the folder that you keep the file. In this example, I have the license key file on /root/Desktop/CDKEY.key so I type

/root/Desktop

Note: When configuration finishes, you can delete the license key file. Kaspersky has already load the license to its system.
Adding the license key
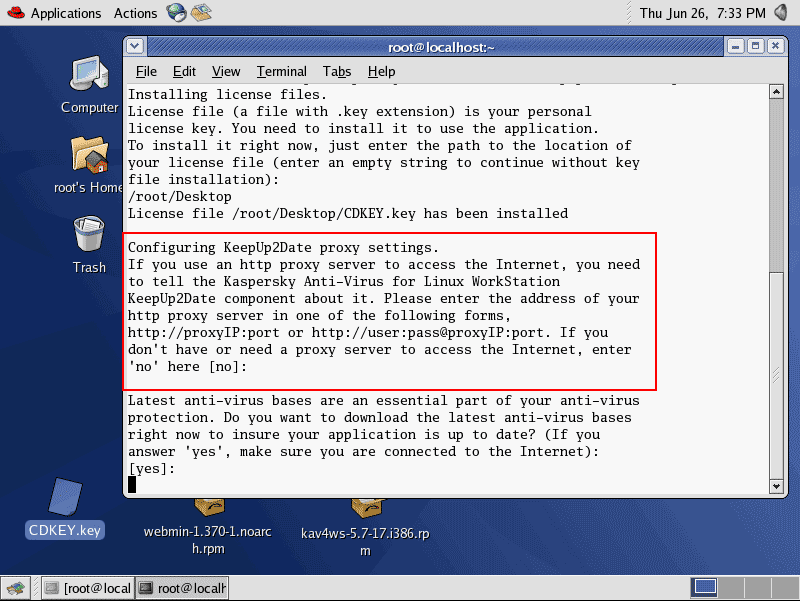
4. Next, the configuration asks for the proxy to access the Internet to get updates. Since I’ll configure an offline system, I can ignore this configuration. I simply press ‘Enter’ to accept default value ([No]).
Configure Kaspersky
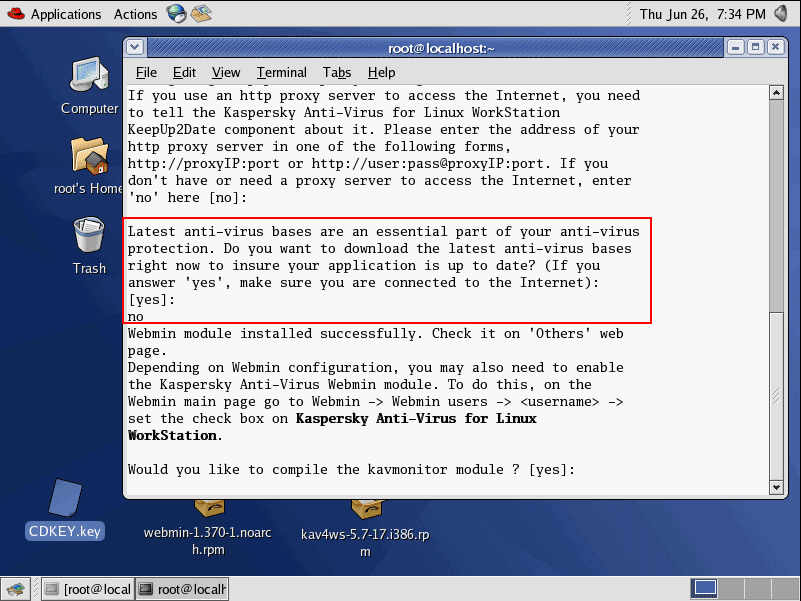
5. Next, it asks to update the signature. Again, this is offline system. I’ll type ‘no’.
Note: For the first time of installation, you have to update the signature at least once. Otherwise, it can’t run. I’ll manually update the signature in the next few steps.
Configure Kaspersky
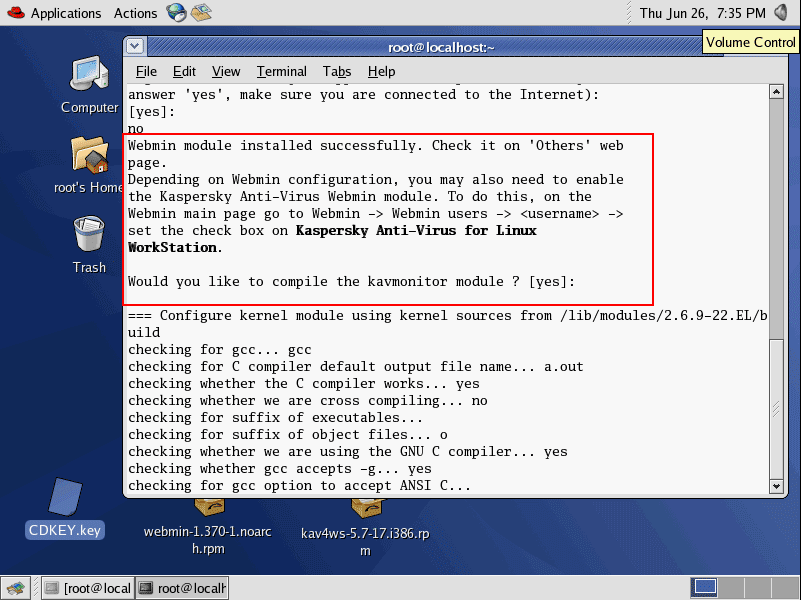
6. Next, it asks to compile kavmonitor, simply press ‘Enter’ to proceed.
Configure Kaspersky
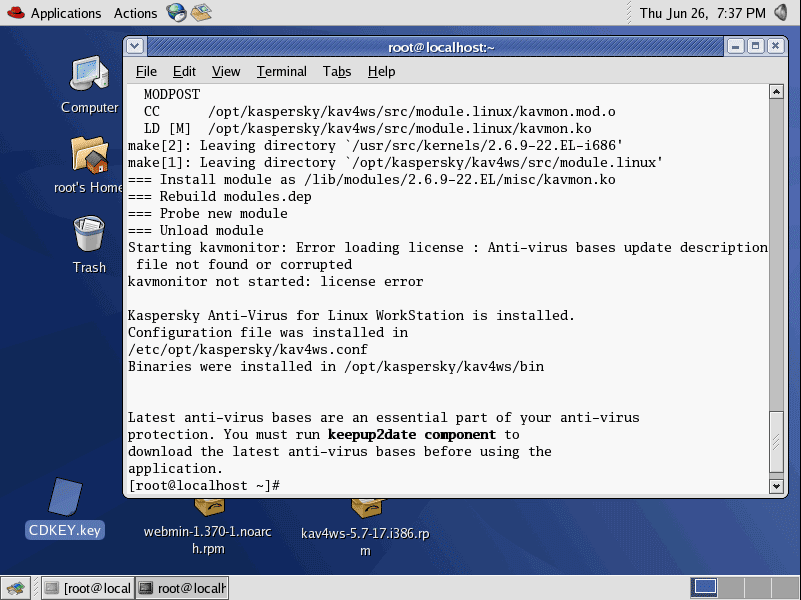
7. Now the Kaspersky Anti-Virus for Linux Workstation is installed. You’ll noticed some error but it’ll be solved after update the signature.
Configure Kaspersky
8. Check if Kaspersky Anti-Virus for Linux is installed properly by open Webmin. Browse to Other -> KAV 5.7 for UNIX WS. This is the configuration page for Kaspersky Anti-Virus 5.7.
Note: If you don’t see this menu, recheck the Kaspersky’s configuration again.
Open Kaspersky on Webmin
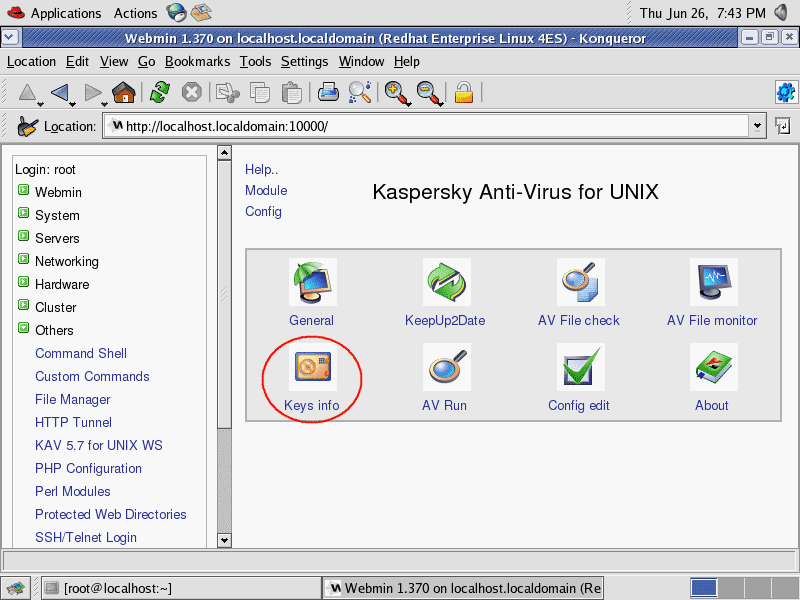
9. Now Kaspersky Anti-Virus for Linux can’t be started yet since you haven’t update the signature. Click on Key Info to view license information.
Check license information
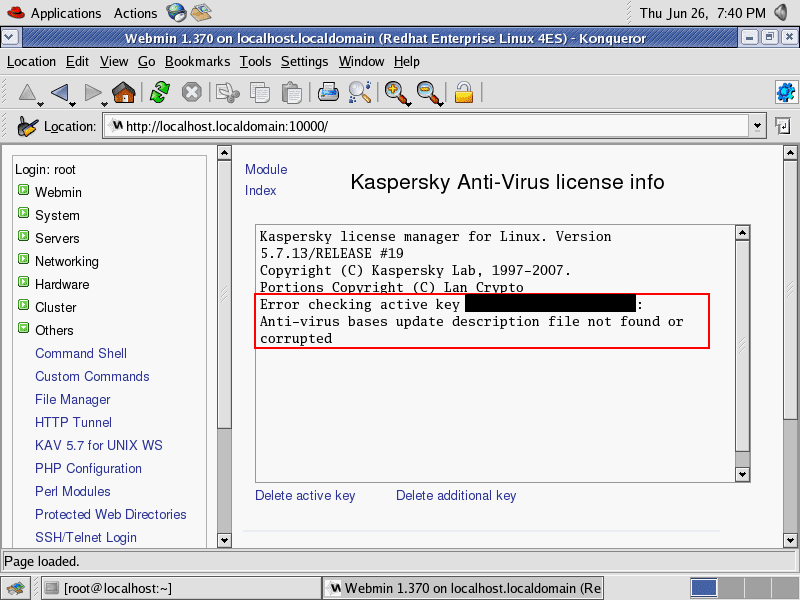
10. You’ll see an error on license page. Don’t worry, this will be solved by update the signature.
Check license information